


CoinPayments Integration Information Steps
Overview of Step 5: Integration Use-Circumstances
CoinPayments provides totally different integration choices to swimsuit numerous enterprise wants, whether or not you’re processing crypto funds for merchandise, companies, or different use instances. With these versatile options, you may select from:
- Built-in Checkout Movement: A pre-built, ready-to-use cost move designed to deal with the checkout course of with minimal setup. Very best for a spread of integrations together with invoicing, cost buttons, e-commerce plugins, and API-generated invoices.
- White-labeled Checkout Movement: A customizable resolution obtainable by means of the CoinPayments API, permitting you to ship a completely branded checkout expertise with their very own branding.
On this information, we’ll discover these use instances intimately, together with:
- Easy methods to implement the Built-in Checkout Movement for various integration sorts.
- Easy methods to create a White-labeled Checkout Movement for a customized buyer expertise.
By the top of this information, you’ll have a transparent understanding of the capabilities of every integration kind and the best way to apply them successfully to what you are promoting operations.
Built-in Checkout Movement
The Built-in Checkout Movement is a pre-built resolution provided by CoinPayments, offering a seamless and environment friendly cost course of for companies. This move requires minimal setup and is on the market throughout a wide range of integration sorts.
Supported Integration Varieties:
- Invoicing Instrument: Generate invoices for one-time or recurring funds.
- Pre-generated Cost Buttons: Enable fast funds for fixed-price objects or companies.
- E-Commerce Plugins: Use for invoicing in supported on-line retailer platforms.
- API-Generated Invoices and Cost Buttons: Automate and customise the checkout course of utilizing API integrations.
Checkout for Invoicing Instrument, Pre-generated Cost Buttons, and e-Commerce Plugins
Bill or Cost Button Technology:
- Cost Technology:
- When consumers obtain an bill generated by way of the CoinPayments Invoicing UI or e-commerce plugin and click on on the “Pay Utilizing CoinPayments” button, they’re redirected to the CoinPayments built-in checkout move
- Additionally, clicking a pre-generated cost button redirects your shopper to the CoinPayments built-in checkout move.
- Electronic mail Entry for Refunds:
- The client supplies their e mail tackle for potential refunds and clicks Proceed.
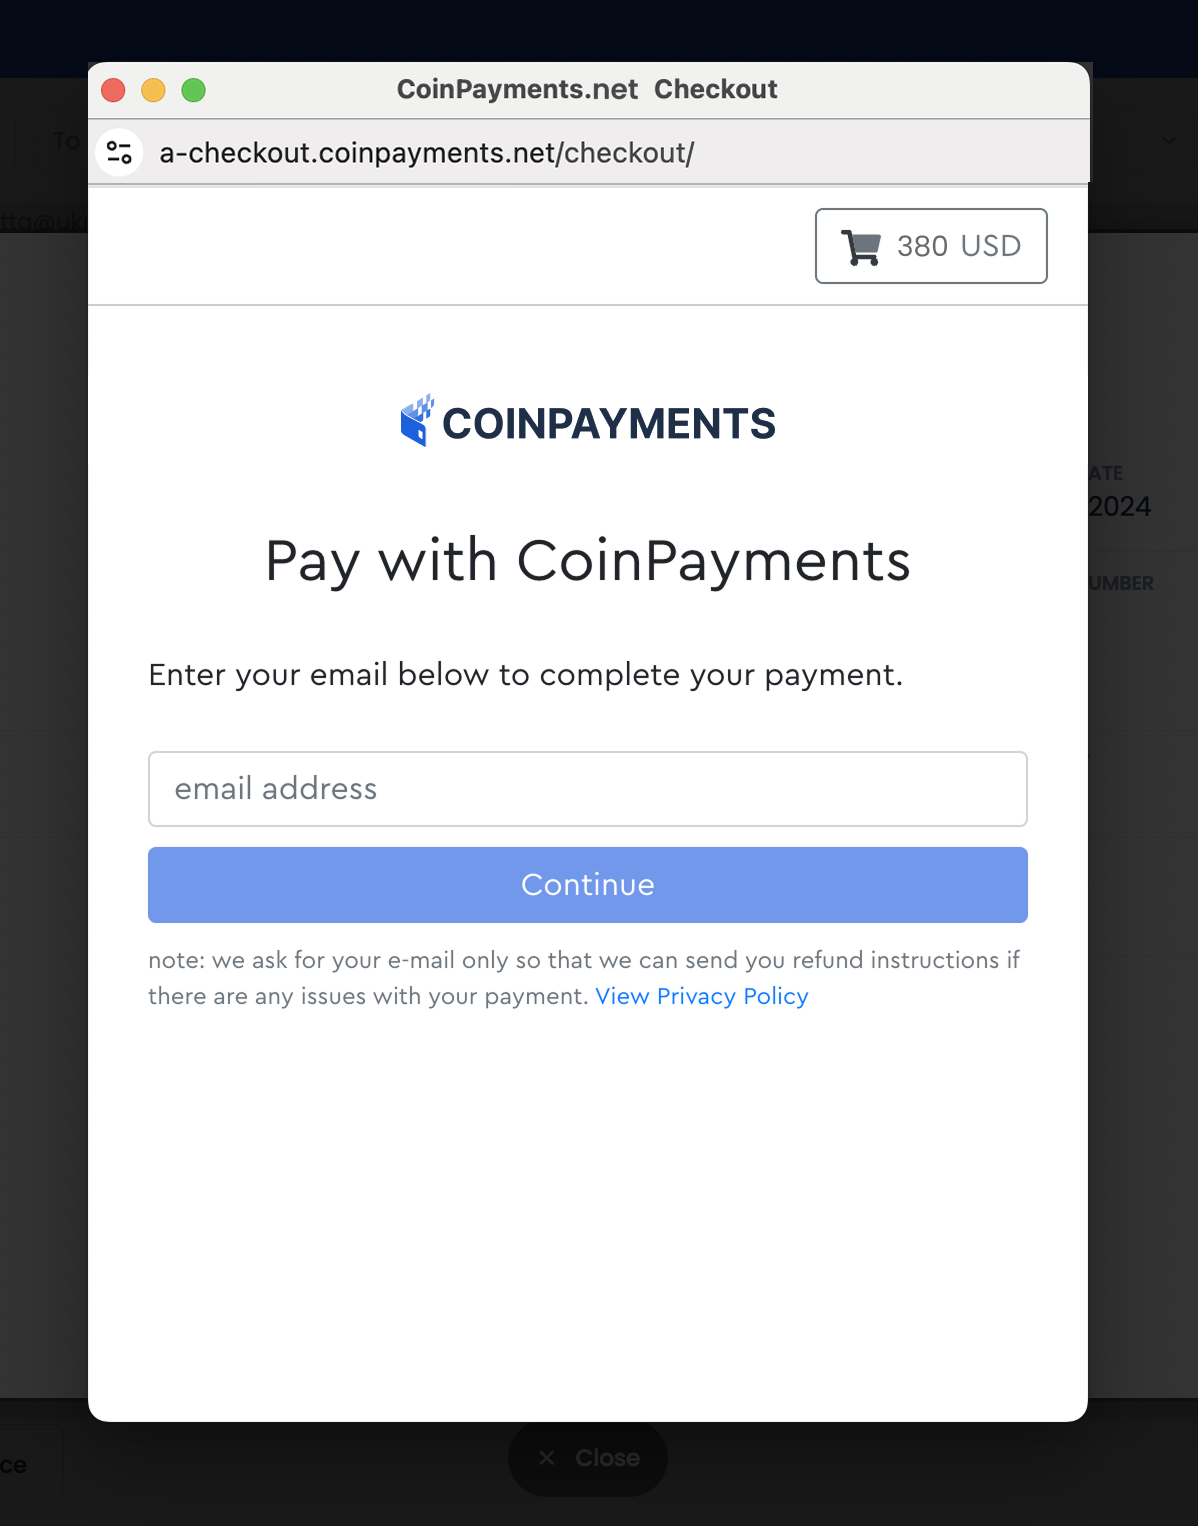
- Cost Foreign money Choice:
- On the checkout step, consumers select from a number of cryptocurrency choices, every with correct conversion charges for the order quantity, giving the pliability to pay with the forex of their selection.
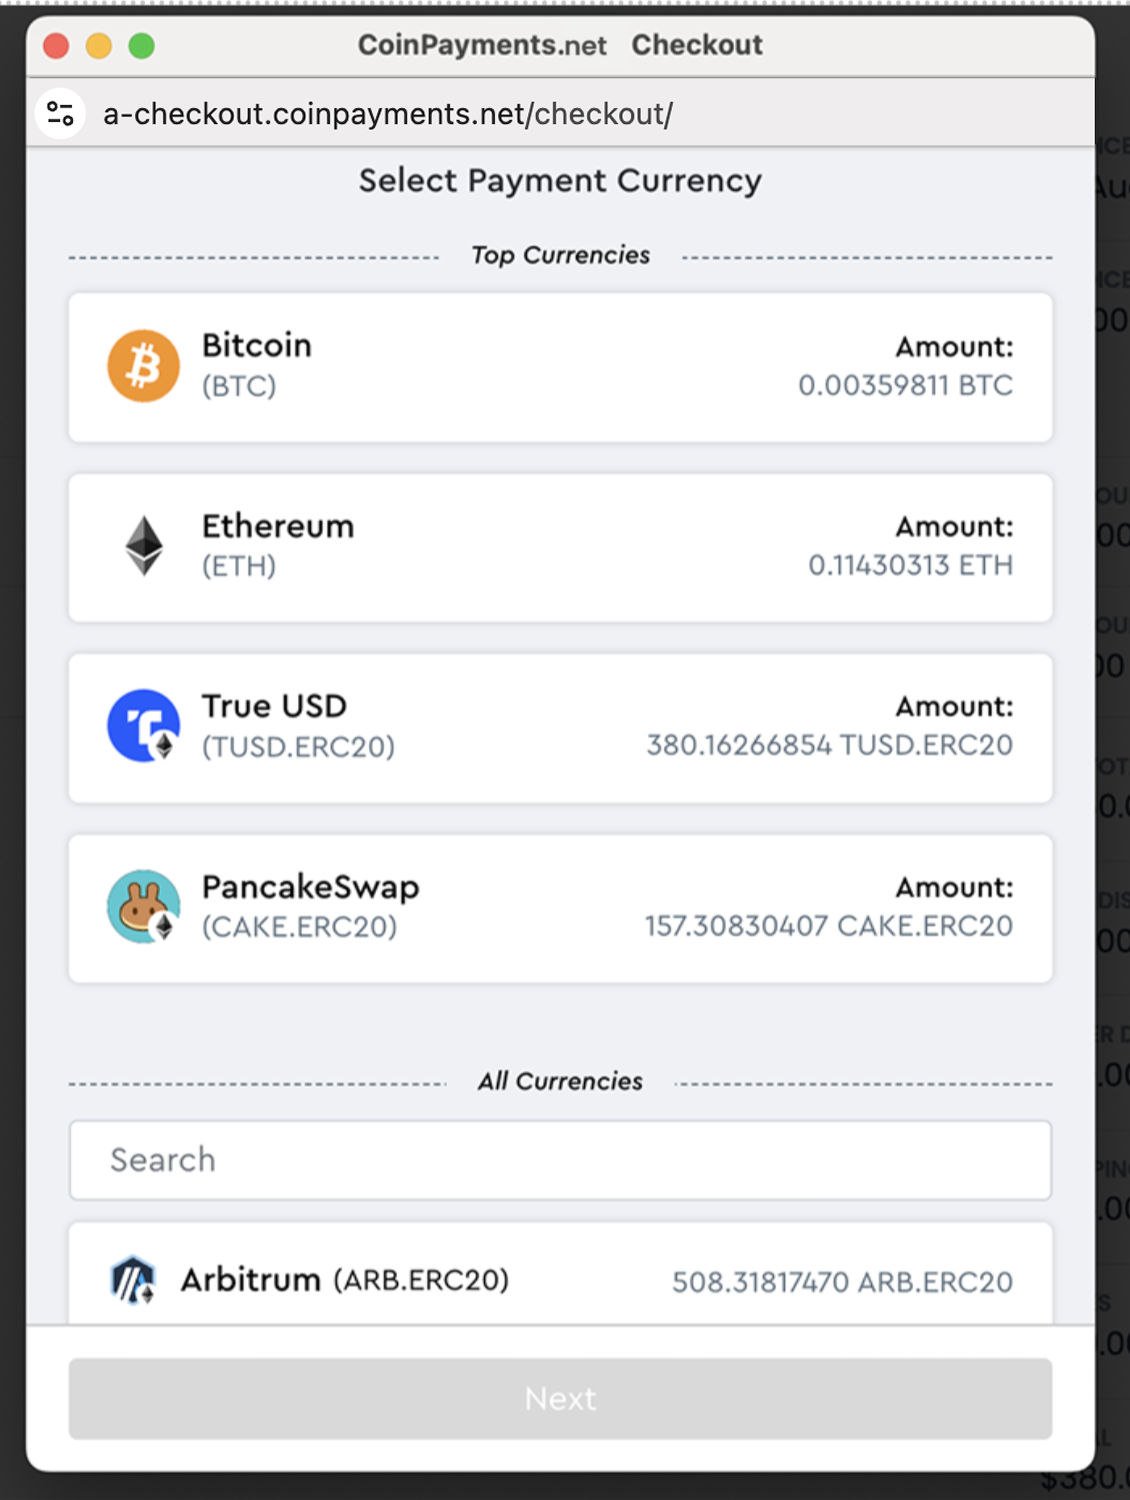
- CoinPayments locks crypto charges for one hour, making certain worth stability in the course of the cost course of.
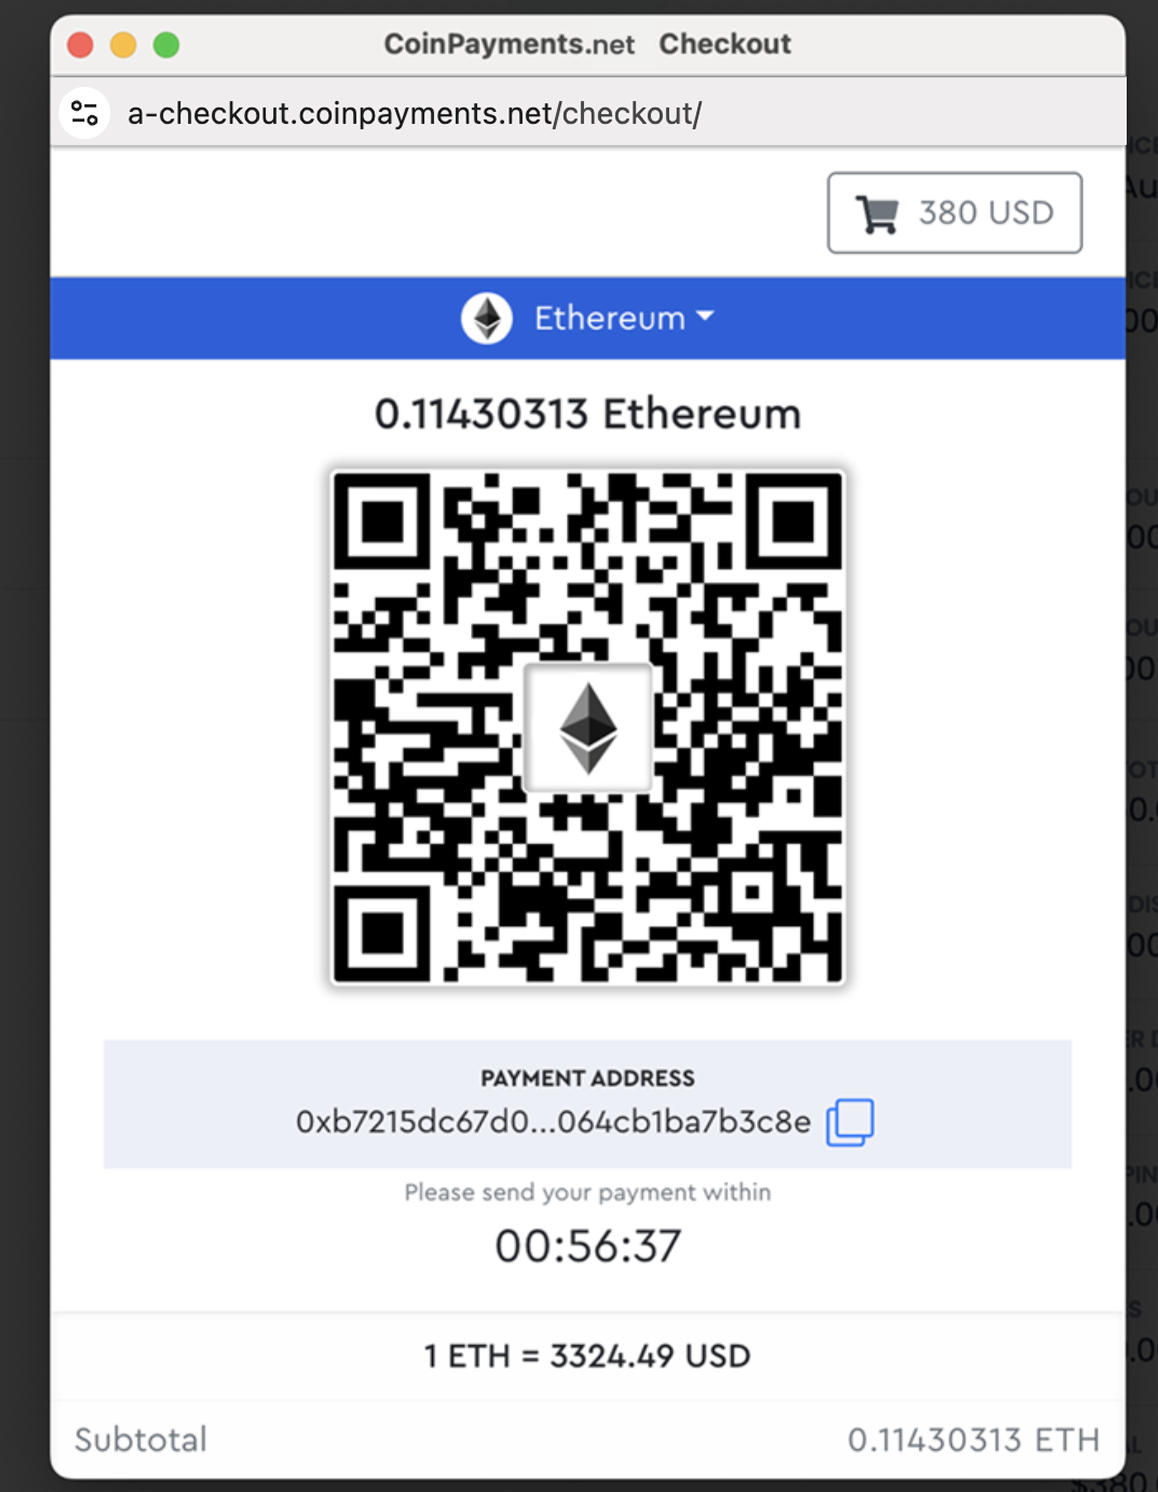
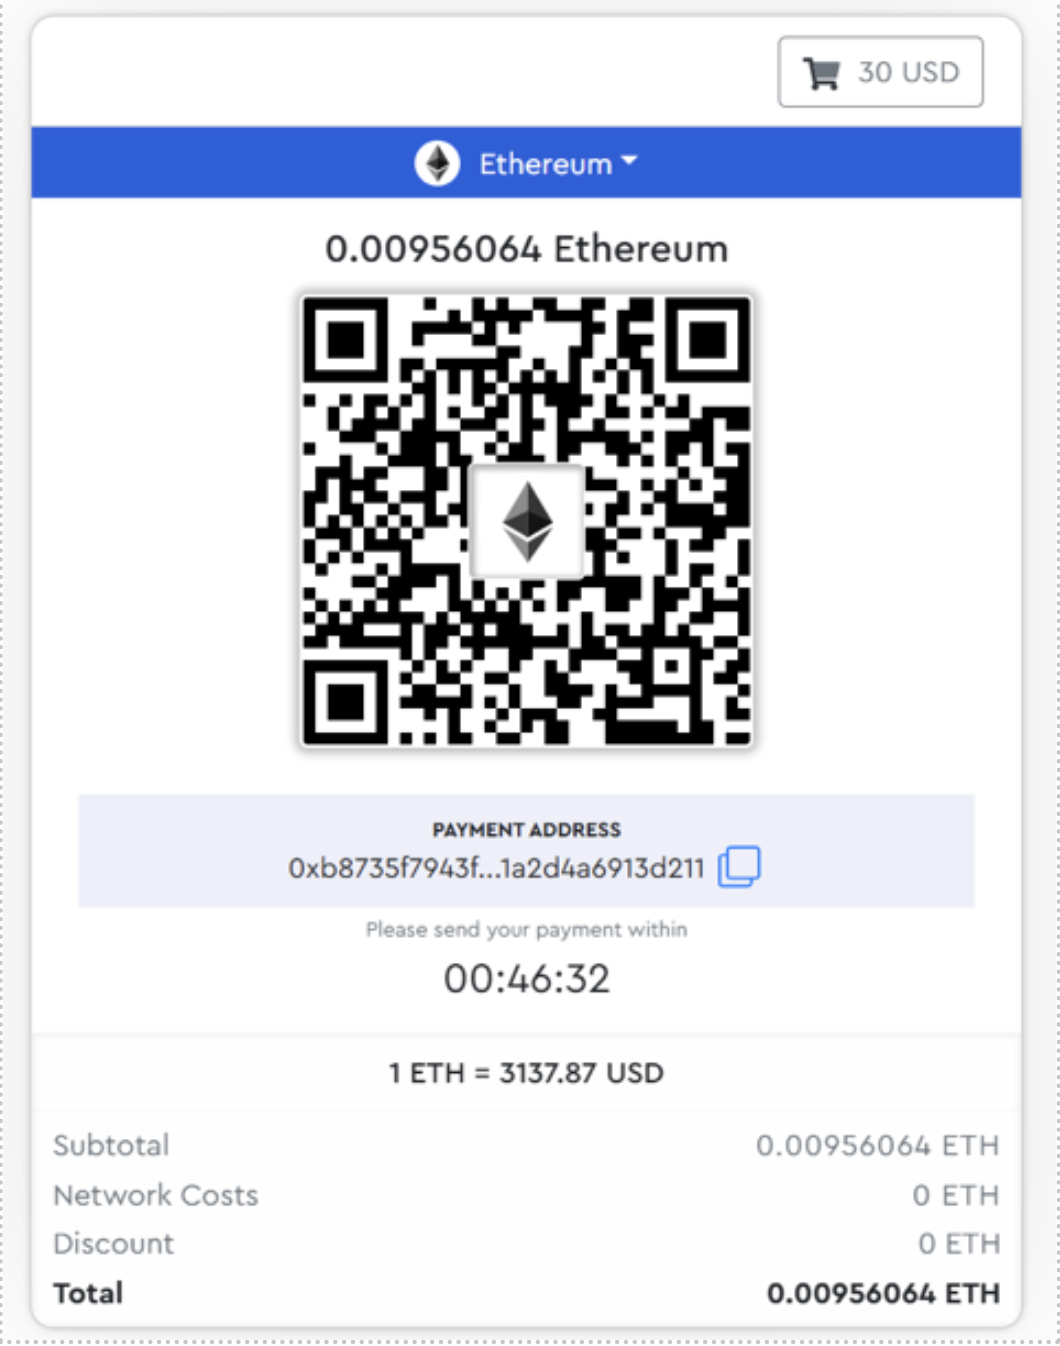
- Cost Completion:
- Patrons could make funds by scanning the supplied QR code or copying the non permanent cost tackle.
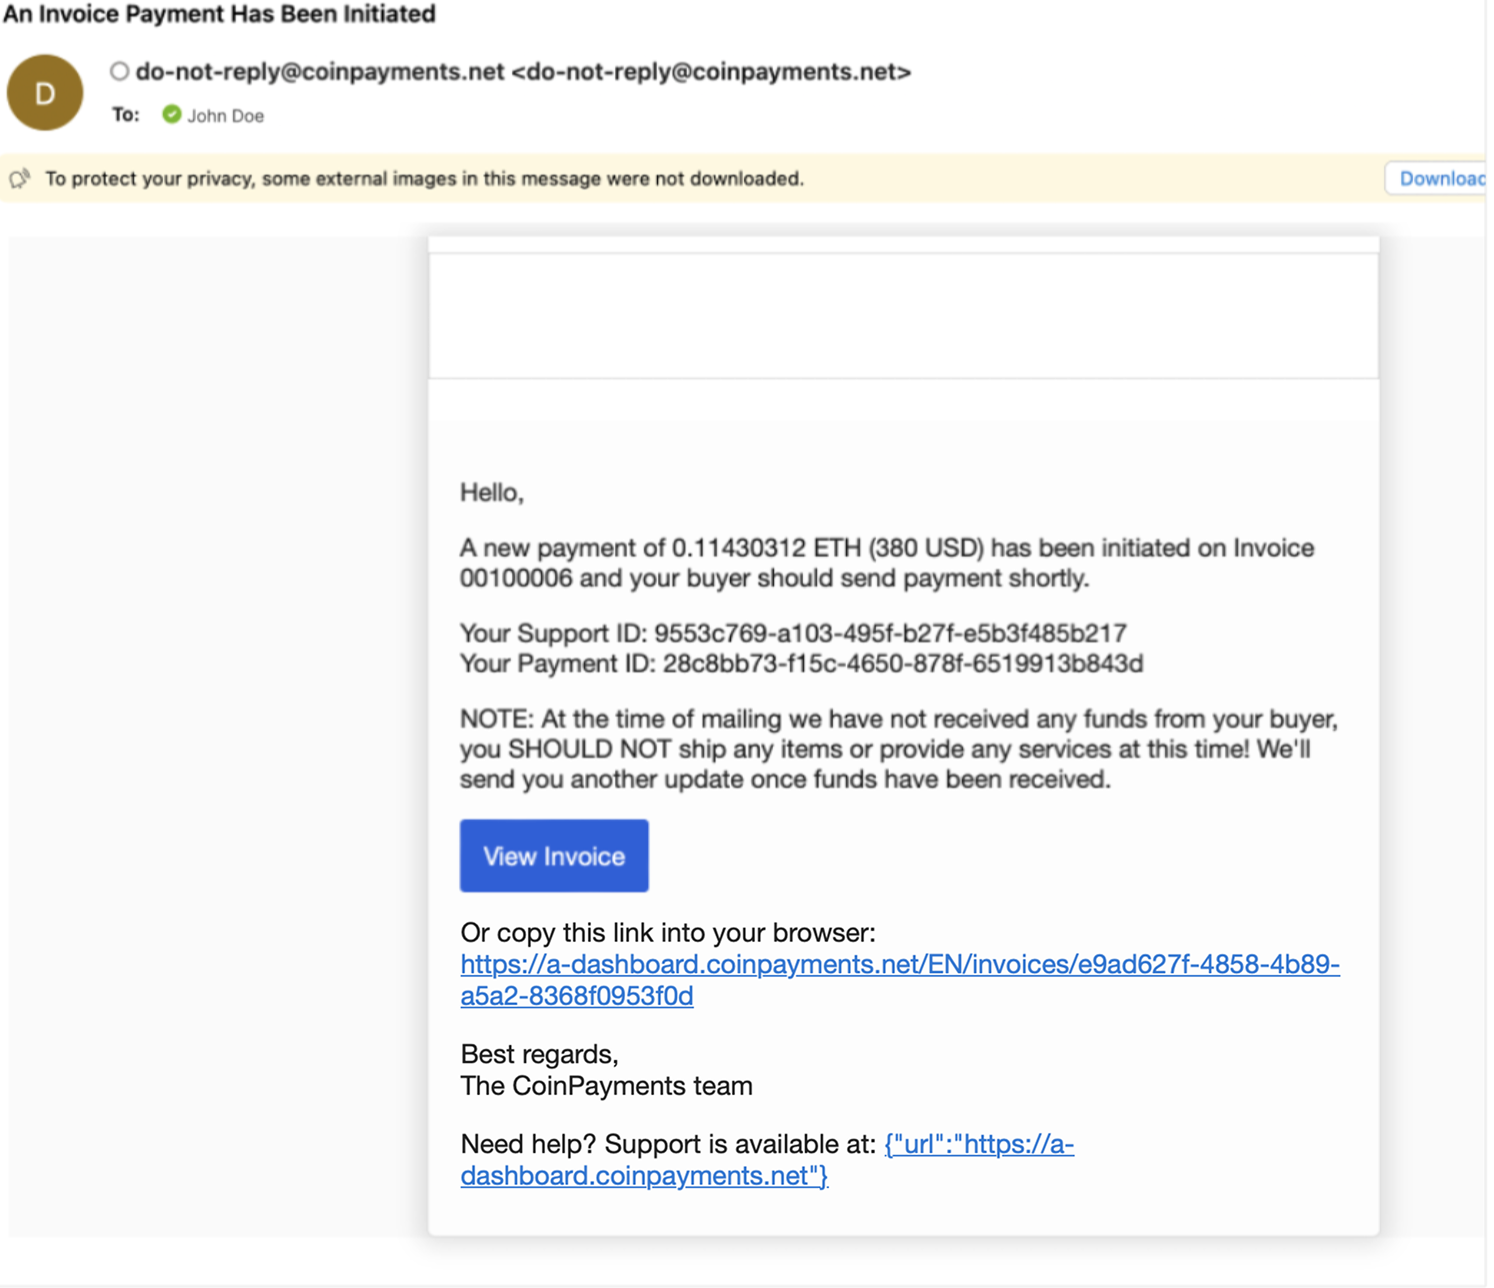
- Electronic mail notifications replace you and the client on the cost standing, together with affirmation.
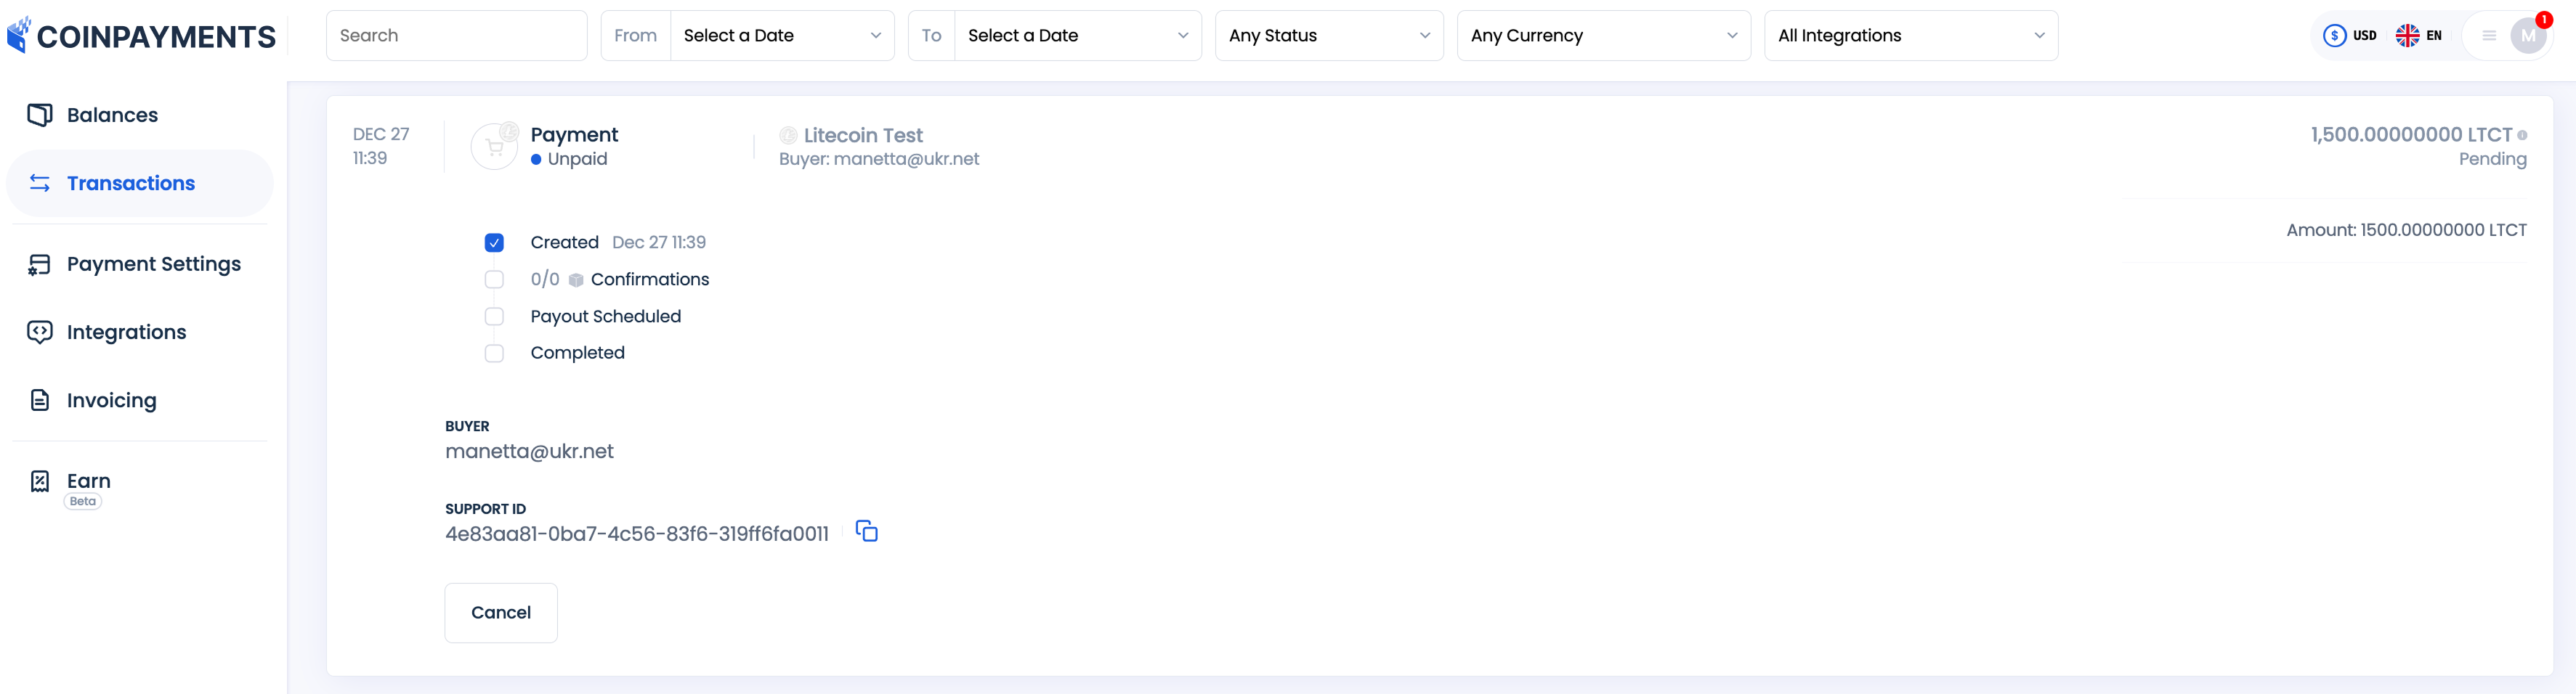
- Transaction Monitoring:
- Test the Transactions part to trace the cost standing, even earlier than full blockchain affirmation.
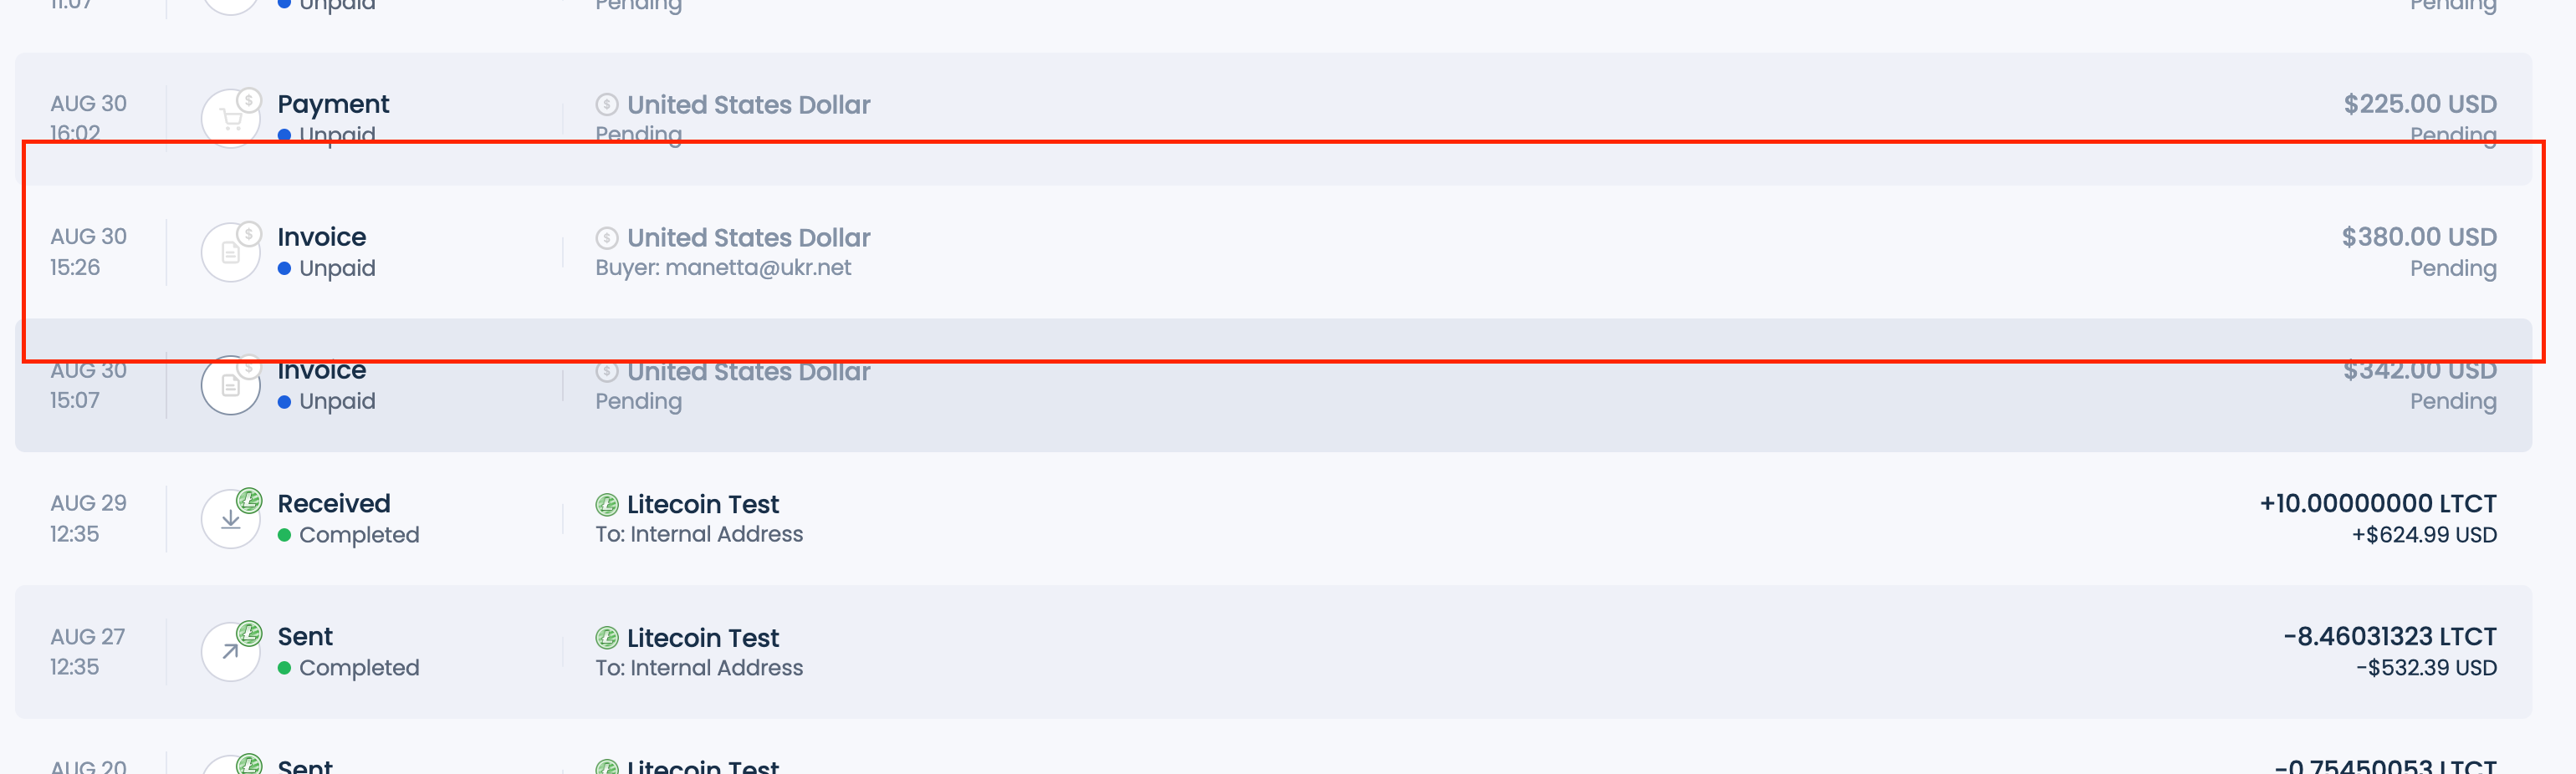
Notice: Transactions generated by way of the CoinPayments Invoicing Instrument or Plugins are categorized as “Bill”, whereas these generated utilizing Cost Buttons are categorized as “Cost” in your transaction historical past.
- You too can examine extra detailed details about the bill/cost by clicking on the transaction.
Checkout for API-Generated Invoices and Cost Buttons
The CoinPayments API provides highly effective instruments for companies to automate cost processing. Utilizing API-generated invoices and cost buttons, you may combine seamless checkout flows tailor-made to particular use instances, corresponding to subscription fashions or on-line purchases.
Use Case: Subscription Funds with API-Generated Invoices
Allow us to contemplate a subscription use case, the place you’ve got a platform that gives companies with a subscription cost mannequin. Each month you want to ship out invoices to your customers with the reminder to pay for the subscription and skill to gather this cost in crypto.
CoinPayments API can automate the invoicing course of. Right here’s the way it works:
- Generate an Bill:
- Use the createInvoice endpoint to create an bill with the next particulars:
- Companies for which the bill is issued.
- Buyer particulars (e.g., identify, cost tackle, and e mail, if obtainable).
- Value of companies.
- Exclude Sure Attributes:
- When creating the bill, be certain that the cost object along with paymentCurrency and refundEmail attributes are excluded except whitelabeling is required.
"cost": {
     "paymentCurrency": "4:0xdac17f958d2ee523a2206206994597c13d831ec7"
     "refundEmail": "jane_doe@hotmail.com"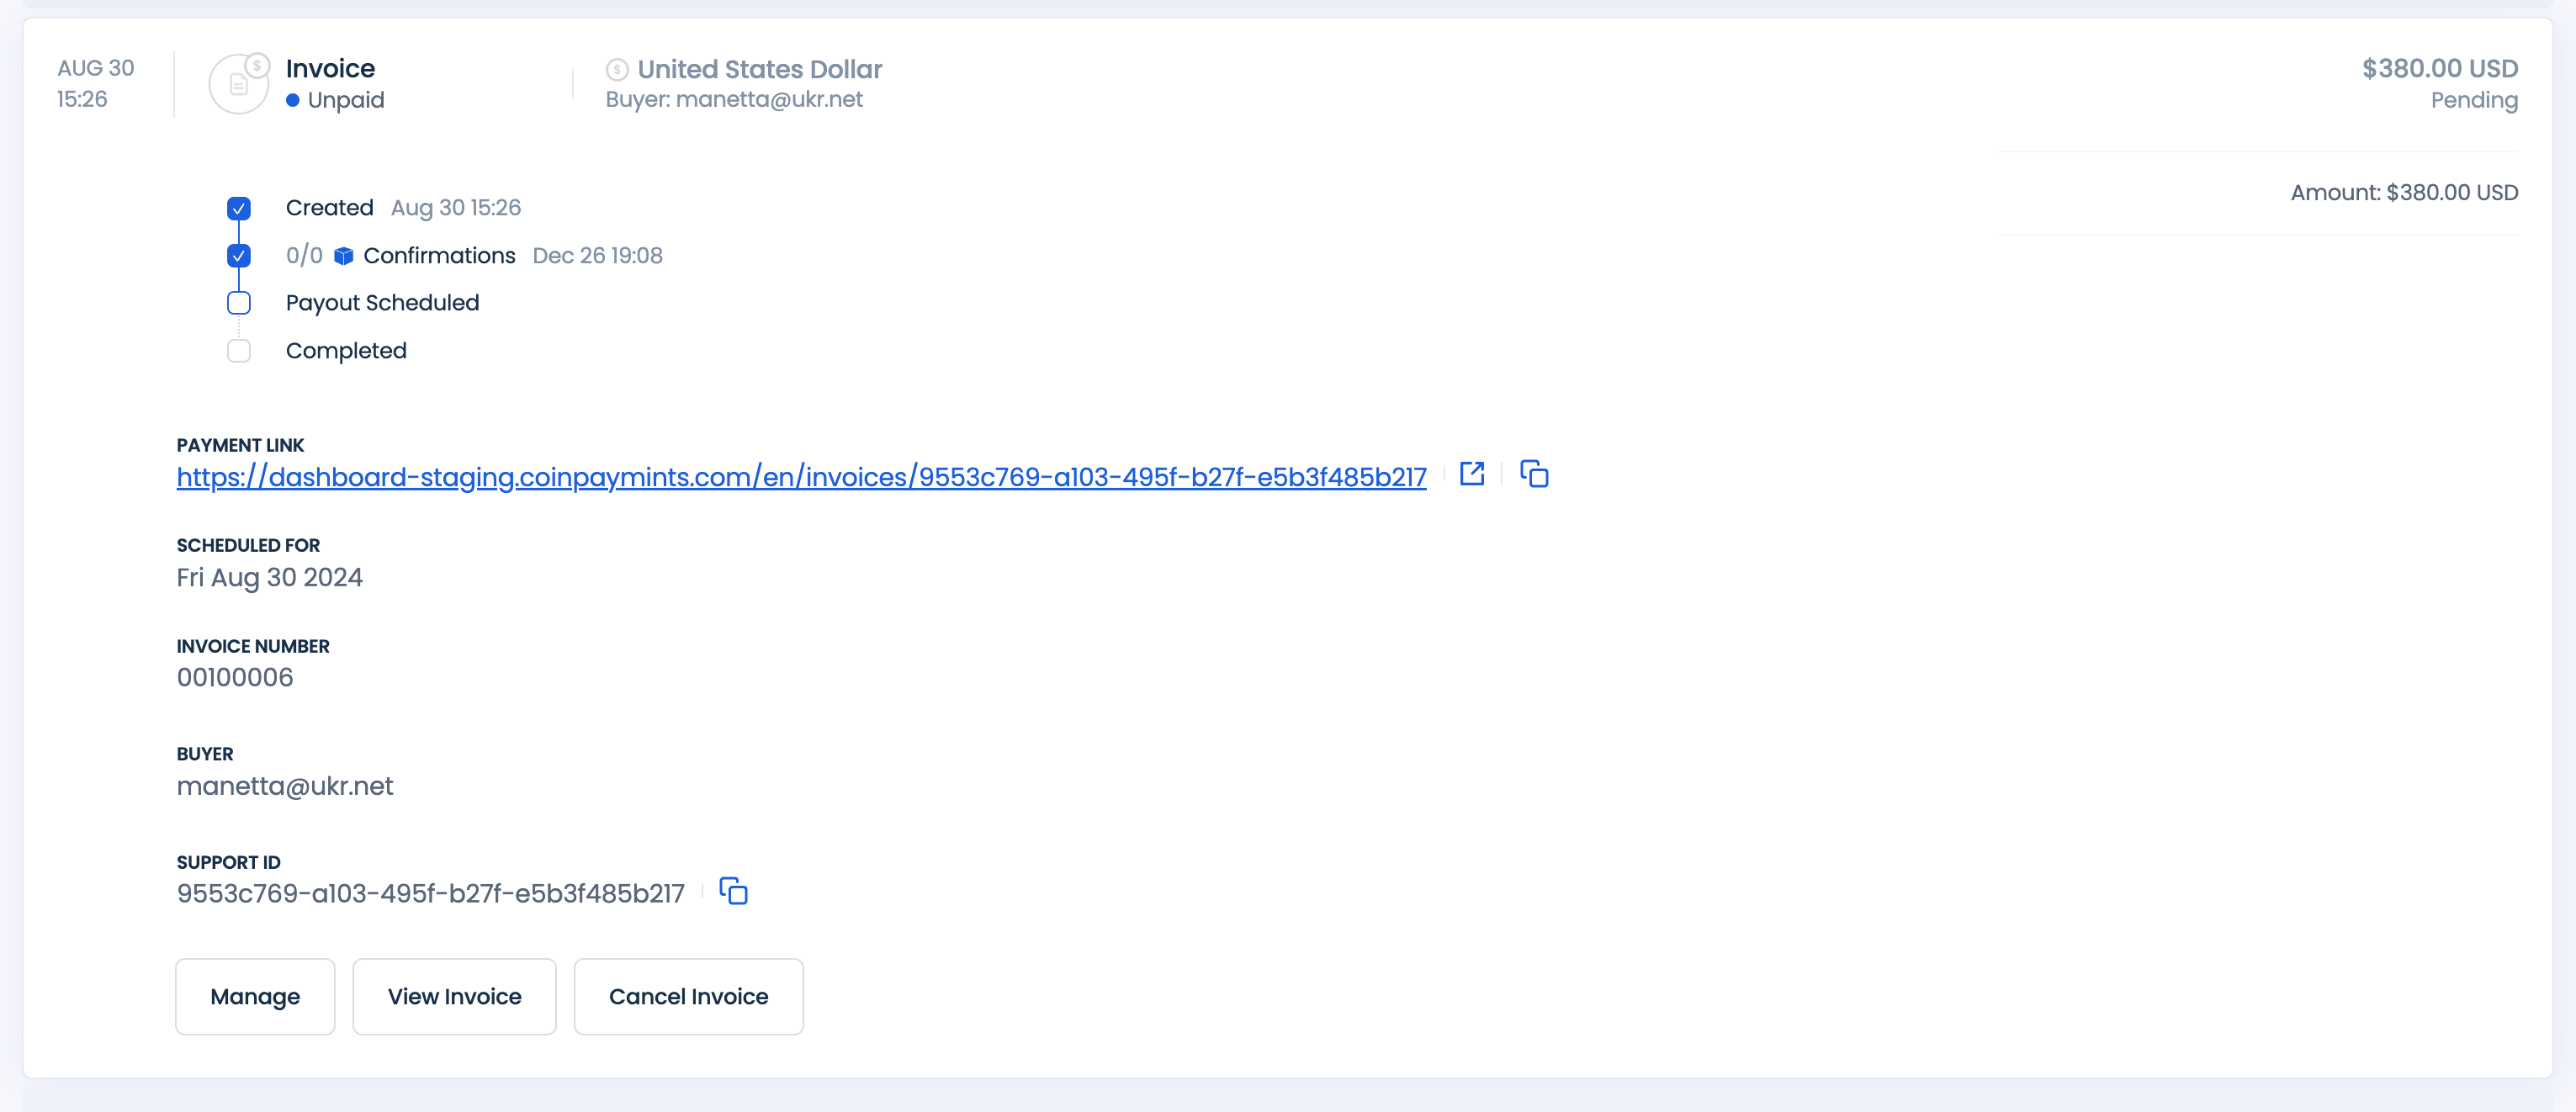
} - Obtain Bill Particulars:
- As a response to the createInvoice endpoint, you’ll obtain:
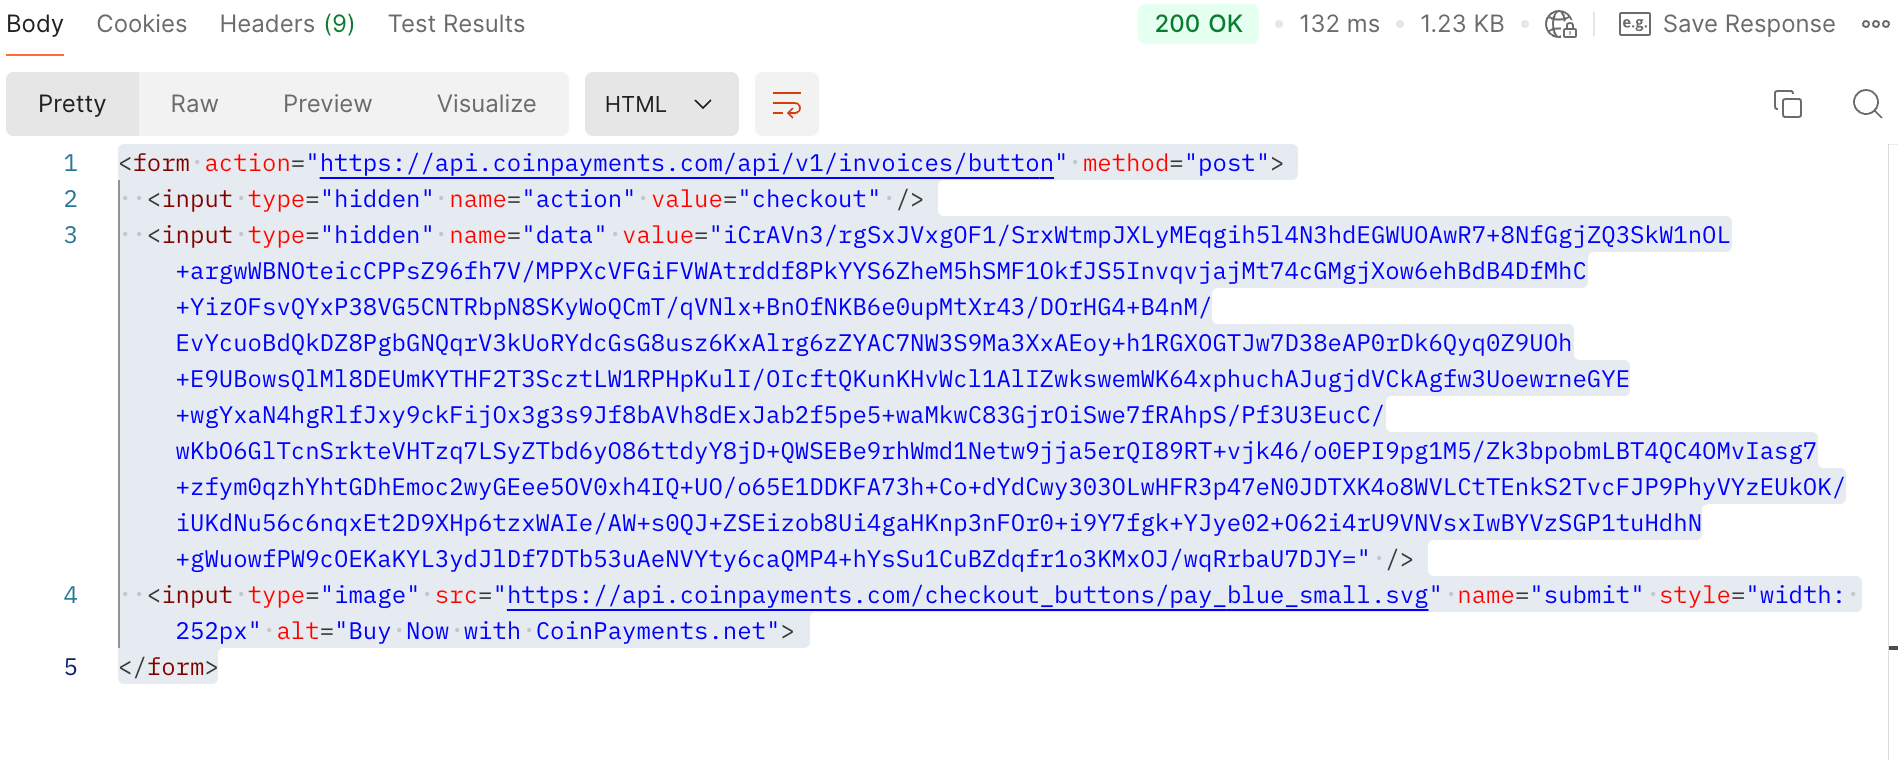
- An Bill ID to examine standing updates.
- A hyperlink to the bill doc with the lively Pay Utilizing CoinPayments button, directing clients to the cost checkout move.

- Share the Bill:
- Share the bill hyperlink with the shopper, or if e mail supply is enabled, they are going to obtain the hyperlink mechanically by way of e mail.
- Moreover, as a response to the createInvoice endpoint, you’ll obtain a direct hyperlink to the checkout move, which you’ll share with clients should you want to not ship the total bill doc.

- Monitor Cost Standing:
- Use the Transactions part to watch the bill standing (transaction kind: “Cost”).
- If webhooks are enabled, obtain real-time notifications for standing adjustments corresponding to:
- invoiceCreated
- invoicePending
- invoicePaid
- invoiceCompleted
- invoiceCancelled
- invoiceTimedOut
Checkout for API-Generated Cost Buttons
Allow us to contemplate one other case. Think about you run a web based store and wish to settle for crypto funds in your items or companies. To make the method fast and seamless in your shoppers, you may add a Purchase-Now button subsequent to every merchandise. Utilizing the CoinPayments API, you may allow your shoppers to finish their purchases with only a few clicks. Right here’s how the method works:
- Generate the Cost Button:
- Use the createBuyNowButton endpoint to generate an HTML code snippet.
- When creating the button, specify the services or products particulars, together with the quantity and price.
- Set the button kind to “everlasting”:
{
  ...
 "Cost": {
   "RefundEmail": "jane_doe@hotmail.com"
  }
} - Add the Button to Your Web site:
- Copy and paste the generated HTML code into your web site the place you need the Purchase-Now button to seem.
- When open by way of browser, the code above will show a button
- Cost Movement:
- When shoppers click on the Purchase-Now button, they’re redirected to the CoinPayments checkout web page to finish the transaction.
- Monitor Cost Standing:
- The cost will probably be logged within the Transactions part of your CoinPayments dashboard with the kind marked as “Cost“.
- The cost will probably be logged within the Transactions part of your CoinPayments dashboard with the kind marked as “Cost“.
- If webhooks are arrange, you’ll obtain notifications for every cost standing replace (e.g., invoiceCreated, invoicePending, invoicePaid, invoiceCompleted, and so on.).
White-labeled Checkout
The Whitelabeled Checkout Movement means that you can totally customise the cost course of utilizing the CoinPayments API, enabling you to supply a branded expertise in your platform. This technique is good for companies that wish to maintain the checkout course of completely inside their very own ecosystem.
Customized Checkout for On-line Shops
For a web based store accepting cryptocurrency funds, the White-labeled Checkout Movement ensures that your clients can browse, store, and pay with out leaving your branded surroundings. Right here’s the way it works:
- Buyer Initiates Checkout:
- Your buyer selects merchandise/companies, provides them to the cart, and proceeds to checkout.
- At checkout, they supply particulars like identify, transport technique, cost tackle, and e mail, then click on Pay.
- Generate an Bill:
- Use the createInvoice endpoint and embody the shopper’s e mail because the RefundEmail for dealing with overpayments or refunds:
{
  ...
 "Cost": {
   "RefundEmail": "jane_doe@hotmail.com"
  }
} - Obtain Bill Particulars:
- The createInvoice response contains:
- ‘invoiceId’ to get cost tackle and examine cost standing
- An inventory of supported cost currencies, quantities, and charges.
- A cost expiration timestamp.
- Generate a Cost Tackle:
- Present Cost Particulars:
- Because of this, purchaser is offered with the next information:
- Chosen cost forex.
- Cost tackle.
- Complete cryptocurrency quantity to deposit.
- Cost timer for finishing the transaction.
- Non-obligatory: Pre-Outline Cost Foreign money:
{
  ...
  "Cost": {
    "RefundEmail": "jane_doe@hotmail.com",
    "PaymentCurrency": "4:0xdac17f958d2ee523a2206206994597c13d831ec7"
    }
} - The indication of the cryptocurrency id will set off creation of the bill along with cost and HotWallet (tackle for purchaser). Within the ‘createInvoice’ response you’ll obtain a hyperlink to the CoinPayments checkout app:
    "invoices": [
        {
            ...
            "checkoutLink": "https://checkout.coinpayments.com/checkout/?invoice-id=56284ebf-8daf-4eed-a3a4-00a3ba255788",
    ...
    }
  ]
} - With this hyperlink purchaser will get on to the checkout web page with the cost tackle, QR code and timer for cost.
- Monitor Cost Standing:
- Use the getPaymentStatus endpoint to trace:
- Cost standing.
- Quantity detected and confirmed on the blockchain.
- Quantity detected however not but confirmed.
- Alternatively, if webhooks are arrange, CoinPayments will notify you of standing adjustments (e.g., invoiceCreated, invoicePending, invoicePaid, invoiceCompleted, and so on.).
Business Deposits and Balances
Business deposits enable retailers to obtain funds for companies corresponding to subscription funds or playing accounts. With CoinPayments API, retailers can handle and sweep these deposits utilizing numerous forms of addresses tailor-made to their particular wants.
Forms of Business Addresses
CoinPayments supplies flexibility in managing industrial funds by means of three forms of addresses: UTXO Addresses, Short-term Account-Based mostly Addresses, and Everlasting Account-Based mostly Addresses. Every tackle kind caters to totally different enterprise wants, providing choices for fund administration, charge optimization, and customer-specific deposits.
- UTXO addresses
UTXO (Unspent Transaction Output) addresses are designed for accumulating funds and minimizing community charges by permitting bulk withdrawals. They’re significantly helpful for retailers who course of giant volumes of transactions or handle a number of buyer accounts.
- UTXO addresses could be completely assigned to a service provider or particular buyer for ongoing use, making certain seamless fund administration with out further reassignment.
- By consolidating transactions into bulk withdrawals, UTXO addresses considerably cut back service and community charges.
- UTXO addresses created by means of the API are thought-about everlasting addresses, providing long-term flexibility for companies managing industrial deposits.
- Short-term Account-based addresses
A short lived tackle is an tackle that isn’t particularly assigned to any consumer of the CoinPayments platform. Such tackle exists in CoinPayments pool of addresses and is briefly used for a selected industrial deposit.
- CoinPayments randomly points non permanent addresses when a service provider requests a deposit in a selected forex.
- These addresses stay assigned to the service provider for a set interval set by CoinPayments earlier than returning to the pool. The lease interval is mechanically renewed if a deposit is made inside this timeframe.
- Funds deposited to non permanent addresses are mechanically consolidated into the service provider’s corresponding pockets steadiness.
- Since these addresses usually are not completely assigned, clients should confirm the right tackle earlier than sending funds to retailers.
- CoinPayments doesn’t cost charges for consolidating funds from non permanent addresses into the pockets steadiness.
- Everlasting Account-Based mostly Addresses
The service provider can determine to make use of everlasting account-based addresses if you will need to handle funds/balances deposited by their clients individually.
- Everlasting addresses are assigned to particular shoppers indefinitely, enabling retailers to trace particular person deposits and balances extra effectively.
- Balances are all the time swept in full to reduce the probabilities of small, unwithdrawable quantities being left as a result of community charges.
The tradeoff of the everlasting tackle vs. non permanent tackle design is charges. To have the ability to use the funds from everlasting addresses, service provider should consolidate addresses balances at some pockets steadiness of the forex. For this every new industrial tackle created throughout the API pockets have to be activated.
- A one-time activation charge is charged in the course of the first withdrawal to consolidate funds from the tackle to the first pockets.
- Subsequent withdrawals incur normal community (switch) charges.
- Though the preliminary activation charge might end in larger upfront prices, repeated withdrawals from consolidated balances are extra economical in comparison with withdrawals from non permanent addresses.
- Retailers can determine when to comb funds from everlasting addresses to their pockets steadiness.
- Consolidation ensures that funds can be found for additional use whereas optimizing prices.
Simplify Business Pockets Prime-up
A typical case for retailers is to make use of wallets and addresses created by way of API for receiving funds from clients, e.g. top-up a subscription or on line casino account. You possibly can simplify the deposit course of for the shopper by incorporating transaction particulars corresponding to deposit quantity, forex, and tackle right into a QR code. This may lower the potential of an error when sending funds.
Beneath is an instance script you should use to generate a QR code for deposits:
```javascript
``` Obtain Business Deposits and Sweep Funds from UTXO Addresses
UTXO (Unspent Transaction Output) addresses are extremely environment friendly for managing industrial deposits as a result of their skill to build up funds and reduce community charges. Beneath is the method for establishing and utilizing UTXO addresses for industrial deposits.
- Create an API Pockets:
- Use the createWallet API endpoint to create an API pockets for the forex you wish to settle for or use an present pockets.
- Be certain that the usePermanentAddresses attribute is about to false when creating a brand new pockets.
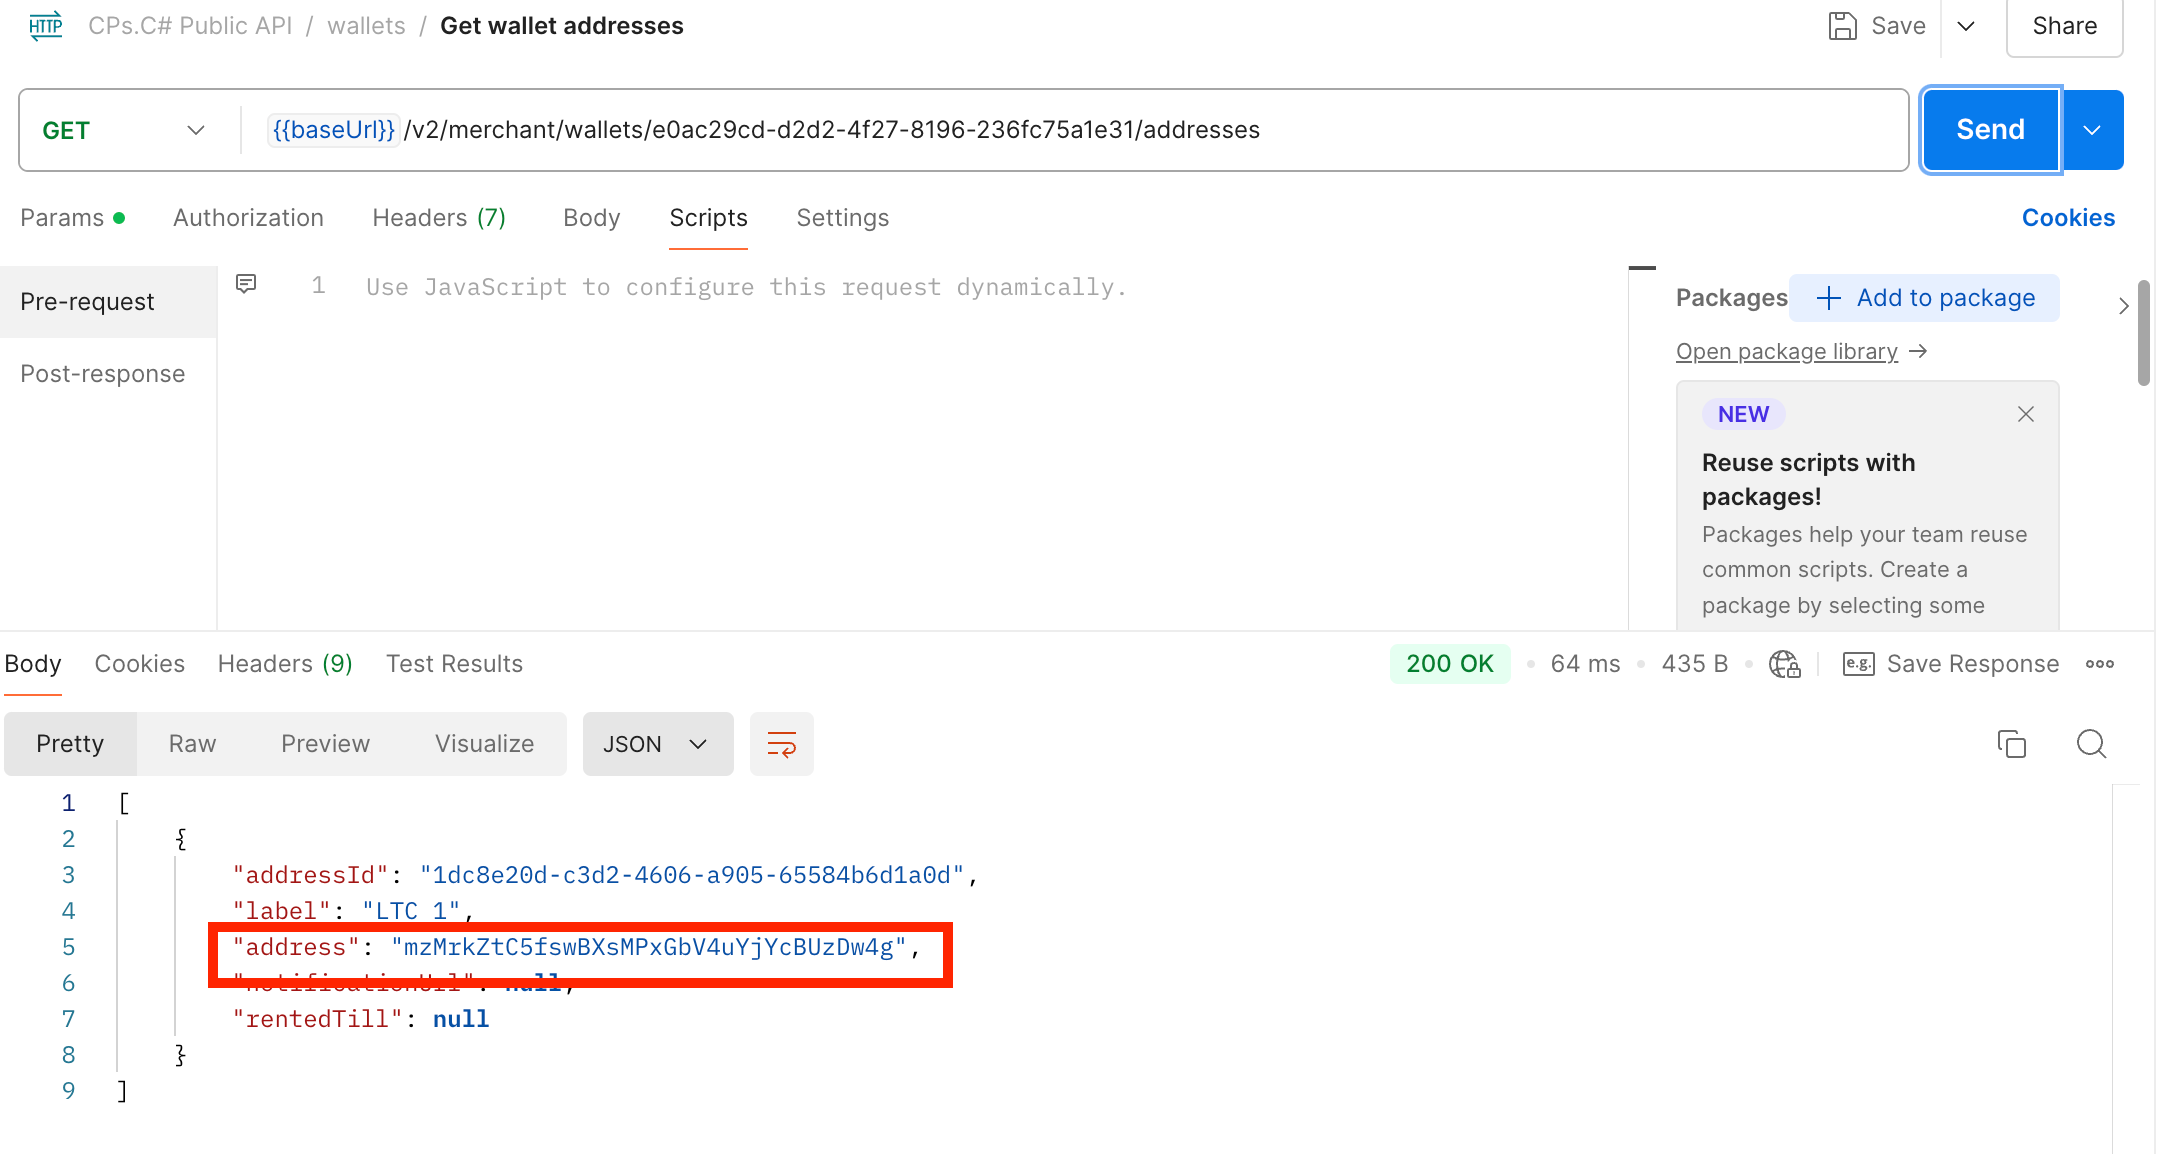
- Generate a Deposit Tackle:
- Share the Tackle with Prospects:
- Present the generated tackle or a QR code to clients for deposits.
- Monitor Transactions:
- Sweep Funds:
- As soon as funds are acquired, you may sweep them with out further effort proper from the pockets steadiness by making a withdrawal utilizing the createSpendRequest endpoint.
Notice: You possibly can select to transform funds in the course of the withdrawal course of if required.
Obtain Business Deposits and Sweep Funds from Short-term Addresses
The move for receiving deposits to the non permanent account-based addresses and withdrawing funds from account-based wallets is identical as for UTXO addresses. Though, there are some things to notice:
- Short-term addresses keep assigned to the pockets by default for the interval of seven days (tackle lease interval). As soon as this time interval expires, the tackle returns to the CoinPayments pool of addresses.
- In case a buyer makes no less than one deposit to the identical tackle throughout the tackle lease interval, the lease interval renews for one more 7 days.
- Acquired funds are mechanically consolidated into the steadiness of the pockets the tackle is assigned to at that second. That’s why it is necessary that clients examine which tackle they ship funds to.
- CoinPayments costs no charges for consolidating funds from non permanent addresses on the pockets steadiness.
- When withdrawing funds from such pockets, you pay just one community charge which is considerably decrease in comparison with withdrawing funds from quite a few common account-based addresses.
Obtain Business Deposits and Sweep Funds from Everlasting Addresses
Everlasting account-based addresses supply retailers the flexibility to handle particular person buyer balances with a better degree of management. These addresses are assigned to particular clients indefinitely, making them appropriate for companies that want to trace deposits and balances for every buyer individually.
Beneath is the method to Use Everlasting Account-Based mostly Addresses
- Create a Everlasting API Pockets:
- Use the createWallet API endpoint to create a pockets in your desired forex.
- Set the
usePermanentAddressesattribute totrueto allow using everlasting addresses.
- Generate Everlasting Deposit Addresses:
- Use the createAddress API endpoint to create a everlasting deposit tackle.
- Initially, the tackle is inactive and though it will possibly obtain funds, it requires activation earlier than funds could be swept from it.
- Tackle activation requires activation charge. Tackle activation takes place throughout the tackle consolidation course of that will probably be described additional.
- Share Tackle Particulars:
- Present the generated tackle or a QR code to clients for deposits.
- Monitor Deposits:
- Activate and Consolidate Funds:
As soon as you might be prepared to comb funds from the everlasting addresses, you first have to consolidate the funds from the addresses on the pockets of the identical forex that doesn't personal everlasting addresses (both Main (UI) Stability of the forex or some other API pockets of the identical forex inside your account that has usePermanentAddresses attribute set to false).
You will have two choices to consolidate addresses:
a. Use the createWalletConsolidation API endpoint to consolidate funds from the addresses that belong to at least one API pockets right into a pockets steadiness. You possibly can consolidate funds to the steadiness of the pockets the place the addresses belong or to some other pockets of the identical forex inside your account:
- as
walletIdStrpath parameter point out the API pockets which addresses you wish to consolidate - as
toWalletIdStrpath parameter point out the API pockets the place funds from the addresses ought to be consolidated. If not supplied, funds will probably be consolidated to the Main Stability of the forex. - as
addressIdsquestion parameters point out the addresses comparable towalletIdStrthat ought to be consolidated
NOTE: Earlier than really executing the consolidation you've got a chance to make a preview of the anticipated consolidation outcomes by utilizing getWalletConsolidation API endpoint. The outcome will present you the breakdown of all charges related to the consolidation of all of the addresses throughout the pockets and the ultimate quantity to be consolidated on the pockets steadiness. You need to use this endpoint to determine which addresses to consolidate to make the sweep most cost-effective.
b. Use the createWalletsConsolidation API endpoint to consolidate funds from the addresses that belong to totally different API wallets of the identical forex right into a single pockets steadiness. You possibly can consolidate funds to the steadiness of any pockets of the identical forex inside your account:
- as
toWalletIdStrpath parameter point out the API pockets the place funds from the addresses ought to be consolidated. If not supplied, funds will probably be consolidated to the Main Stability of the forex. - as
walletIdandaddressesrequest physique attributes point out wallets and their addresses that ought to be consolidated
NOTE: Earlier than really executing the consolidation you've got a chance to make a preview of the anticipated consolidation outcomes by utilizing createWalletsConsolidationPreview API endpoint. The preview outcome will present you the breakdown of all charges related to the consolidation and the ultimate quantity to be consolidated on the pockets steadiness. You need to use this endpoint to examine whether or not the consolidation end result is what you really anticipate and if any changes to the listing of addresses to be consolidated is critical to make the sweep most cost-effective.
- Charges Throughout Consolidation
- Activation Payment:
- For newly created, inactive addresses, an activation charge is charged in the course of the first consolidation.
- This charge applies to allow withdrawals from the everlasting tackle for the primary time.
- Switch Payment:
- Each time funds are consolidated (no matter whether or not the tackle is already activated), a Switch Payment is utilized for sweeping funds from everlasting addresses to the pockets steadiness.
- Already Activated Addresses:
- No activation charge is charged for addresses which have already been activated in a earlier consolidation.
- Activation Payment:
- Withdraw Funds:
- As soon as funds are consolidated into your pockets, you may withdraw them utilizing the createSpendRequest endpoint.
- Throughout withdrawal, you've got the choice to transform the funds into one other forex. To transform funds, specify vacation spot forex id as
toCurrencyrequest physique attribute of the spend request. - To make a easy withdrawal with out conversion
toCurrencyhave to be the identical because the forex of thewalletIdStrpath parameter.
Handle Business Balances by way of Dashboard UI
- Easy methods to Transfer Funds from Main Stability to API Stability
CoinPayments separates funds between the Main steadiness and API balances to reinforce flexibility and safety. This separation permits companies to effectively handle funds for various functions whereas sustaining strict management over entry.
- Main Stability: Funds saved right here can solely be accessed by means of the Dashboard UI and usually are not obtainable by way of API.
- API Balances: Funds in API wallets are accessible solely by means of the API integration below which they had been created, however they can be considered by way of the Dashboard UI.
This method supplies a number of key advantages:
- Builders don't have any entry to the principle enterprise funds saved within the Main steadiness.
- Builders can solely handle funds particularly assigned to API wallets, making certain restricted publicity to delicate funds.
- Companies can shortly allocate and prime up API pockets balances for particular functions, corresponding to venture budgets or operational bills.
On this tutorial you'll discover ways to prime up your API steadiness by way of Dashboard UI.
- Create an API Pockets:
- Use the createWallet API endpoint to generate an API pockets for a particular forex.
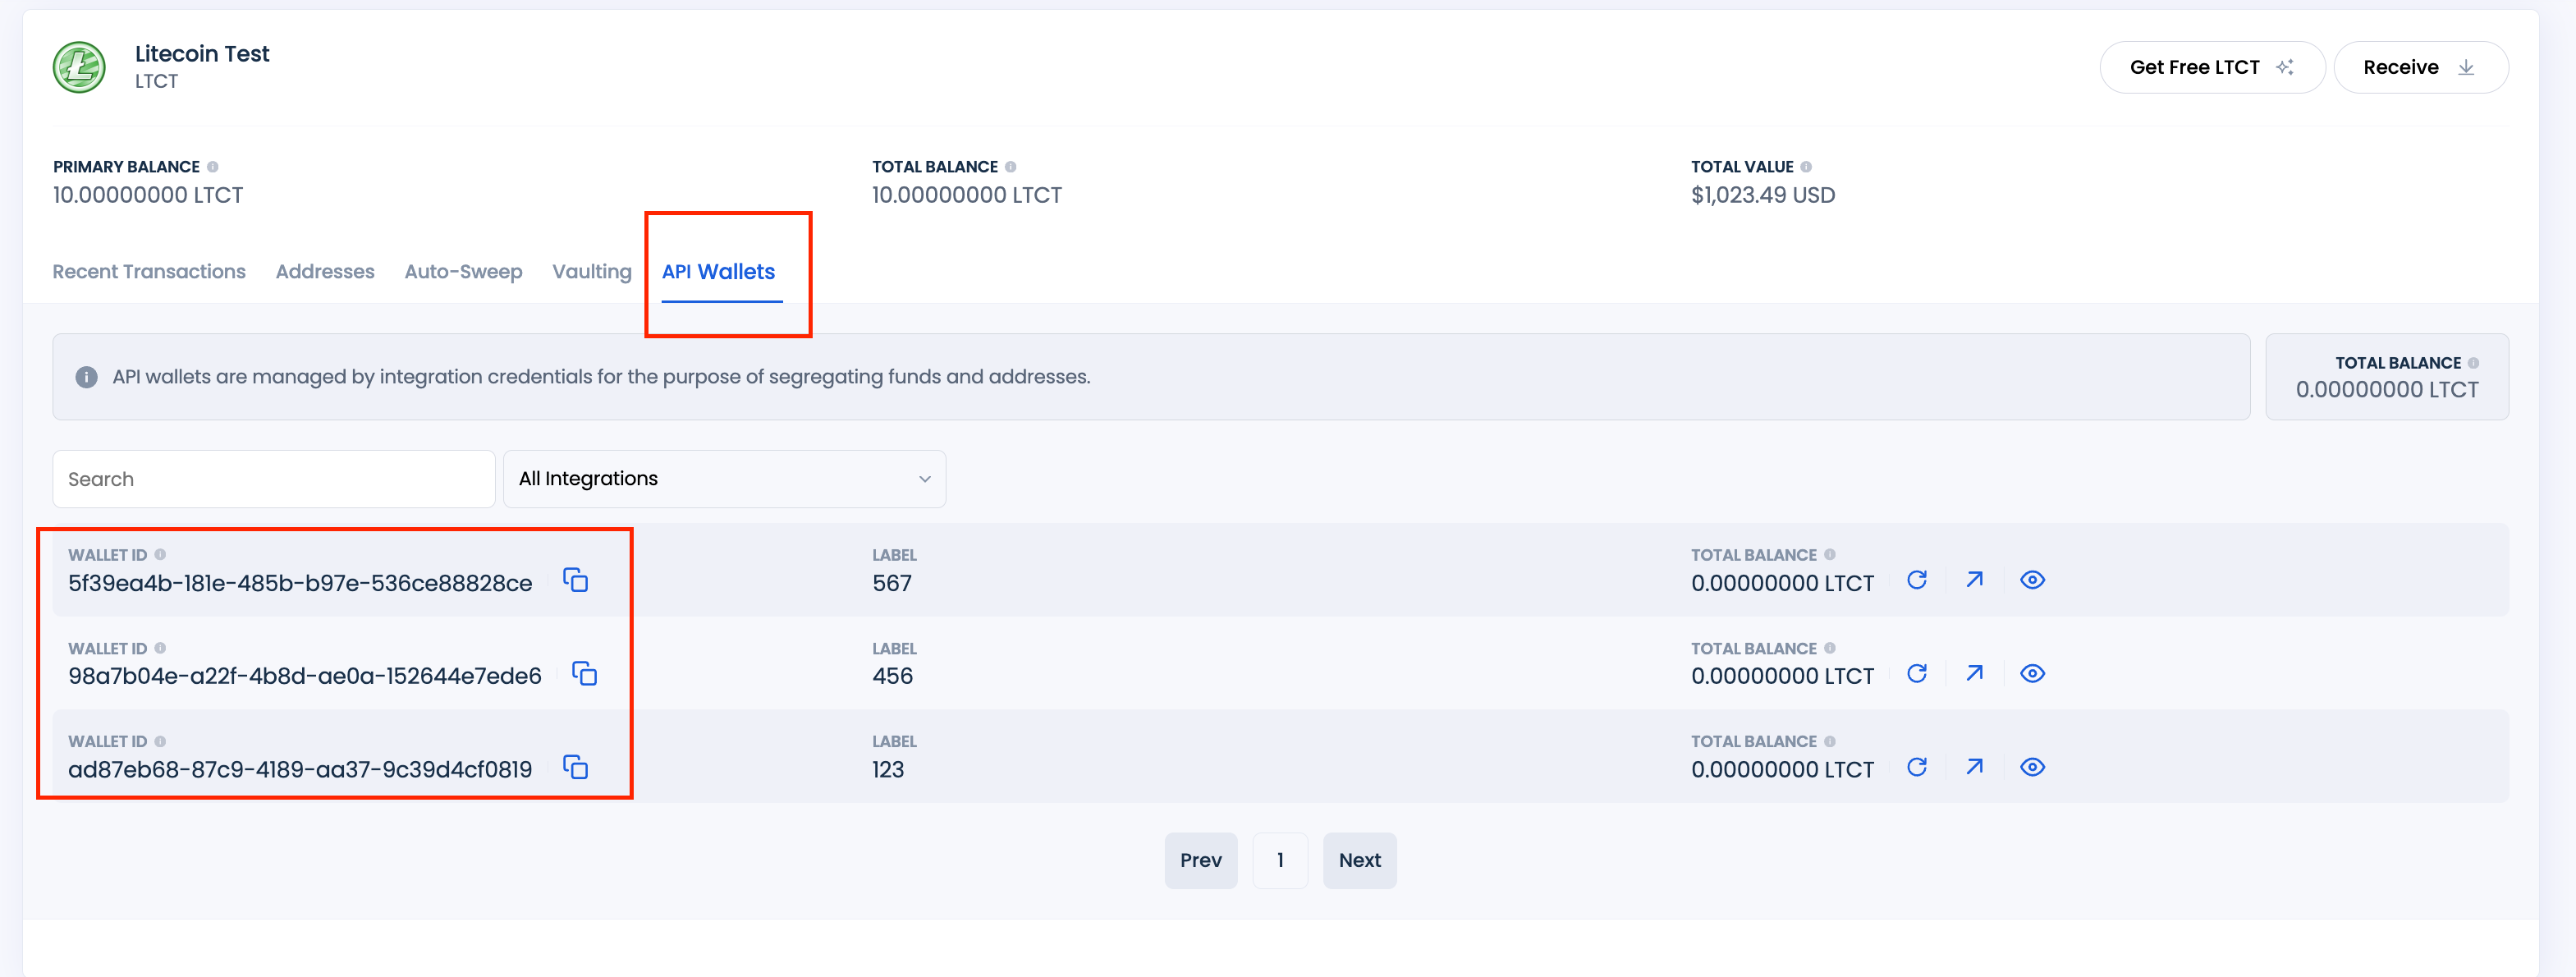
- As soon as created, the pockets will seem below the API Wallets tab in your Main steadiness for that forex.
- Copy the API Pockets ID:
- For UTXO or account-based addresses with non permanent wallets, copy the API pockets ID from the API Balances tab to deposit cash from the Main Stability.
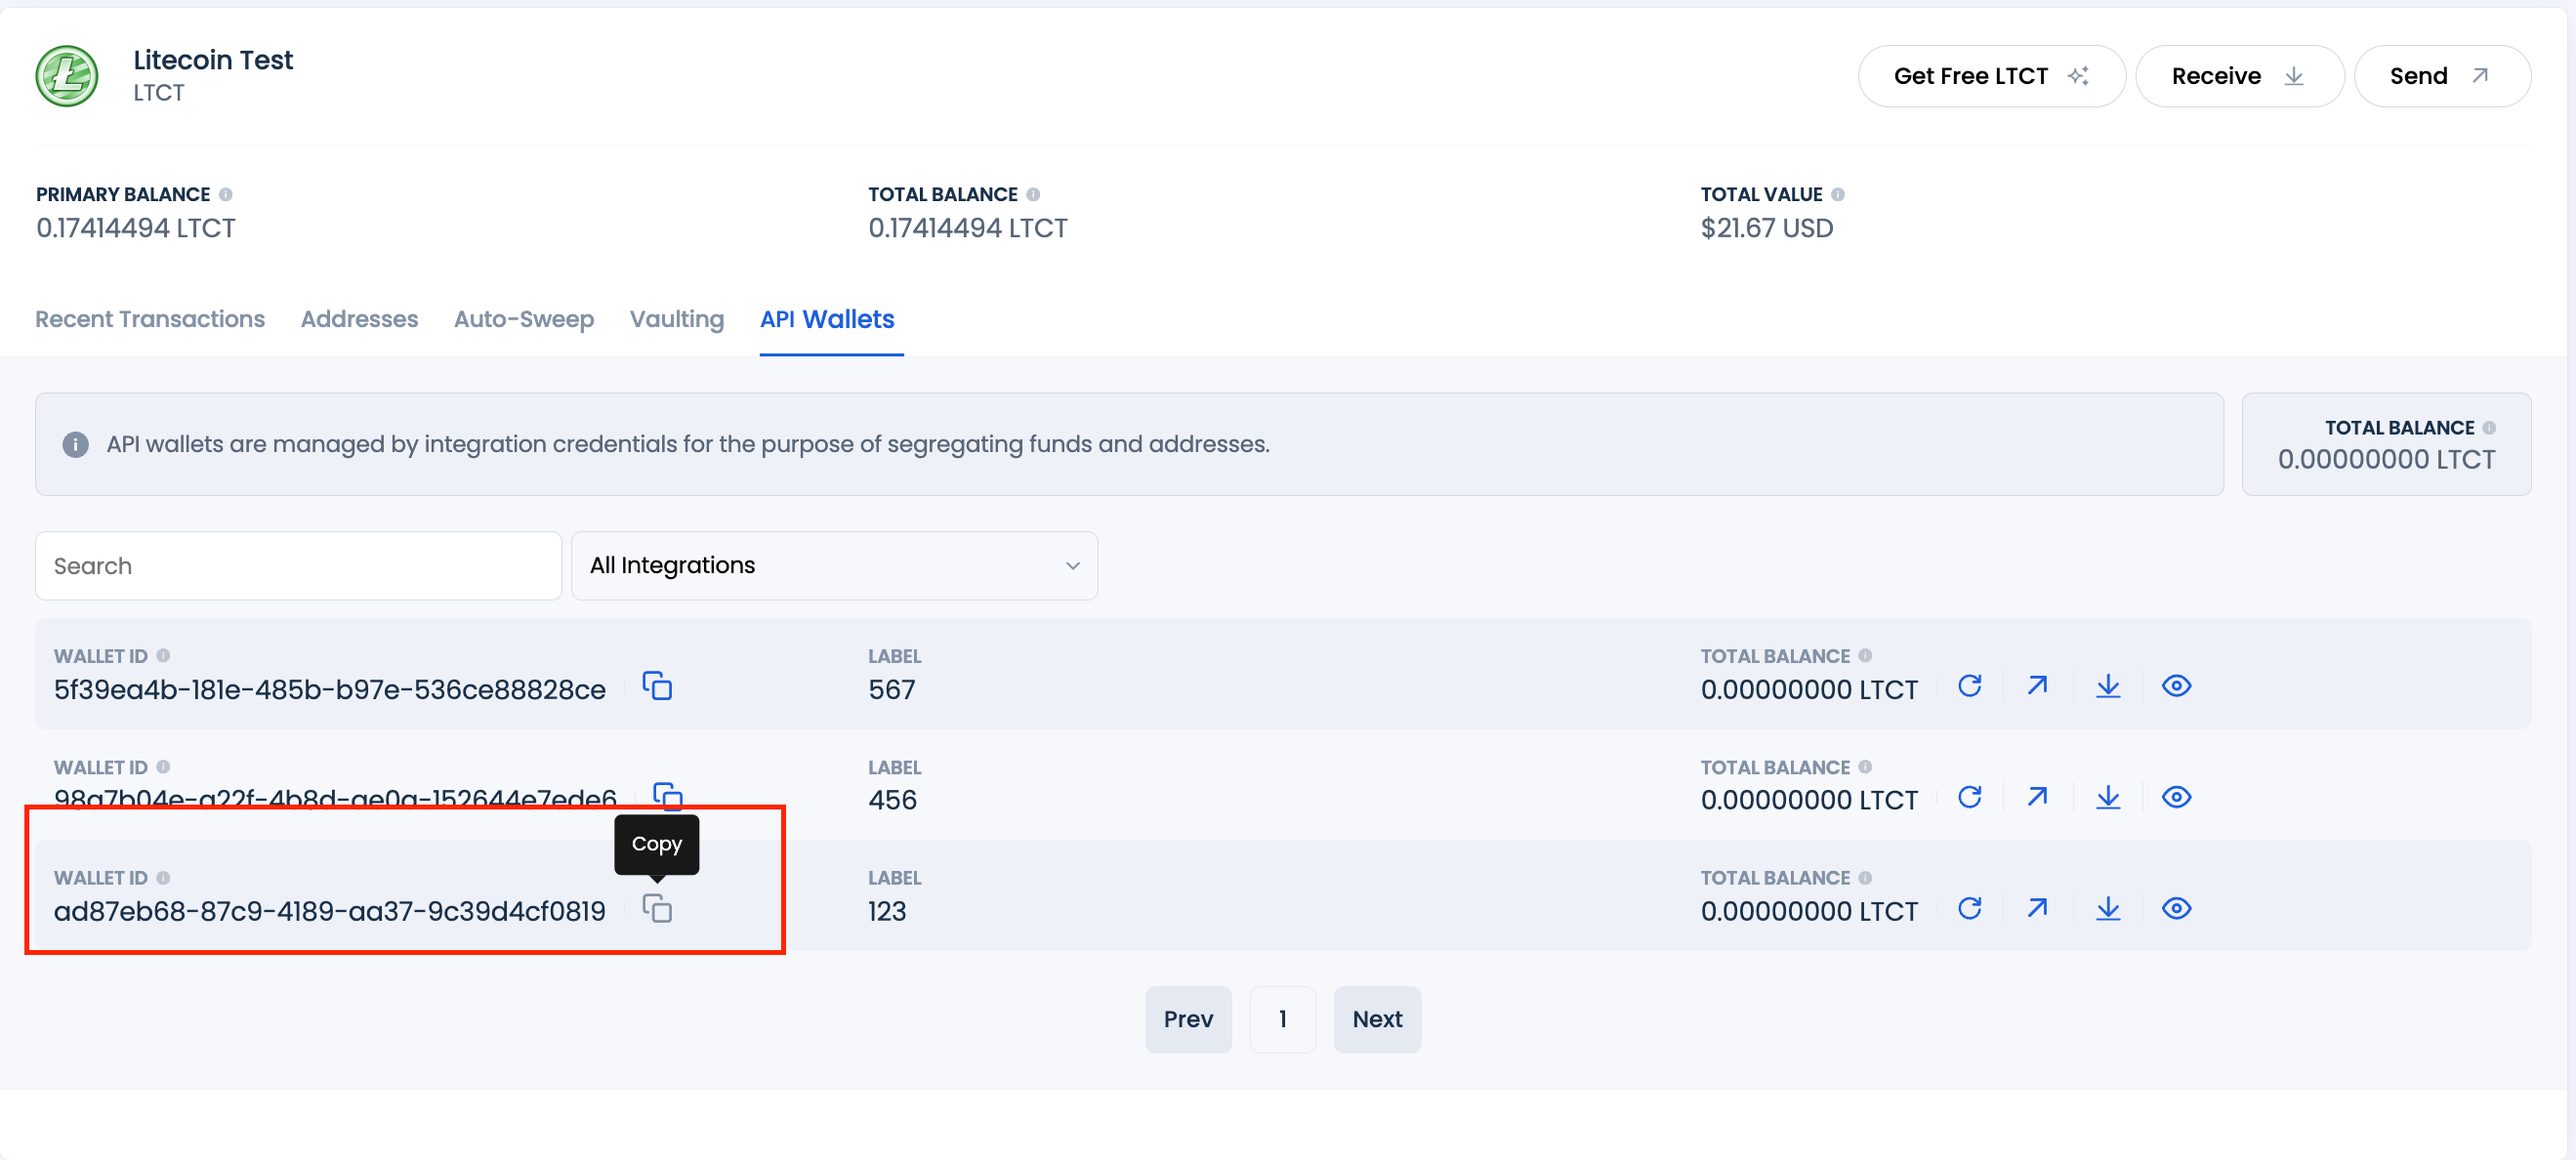
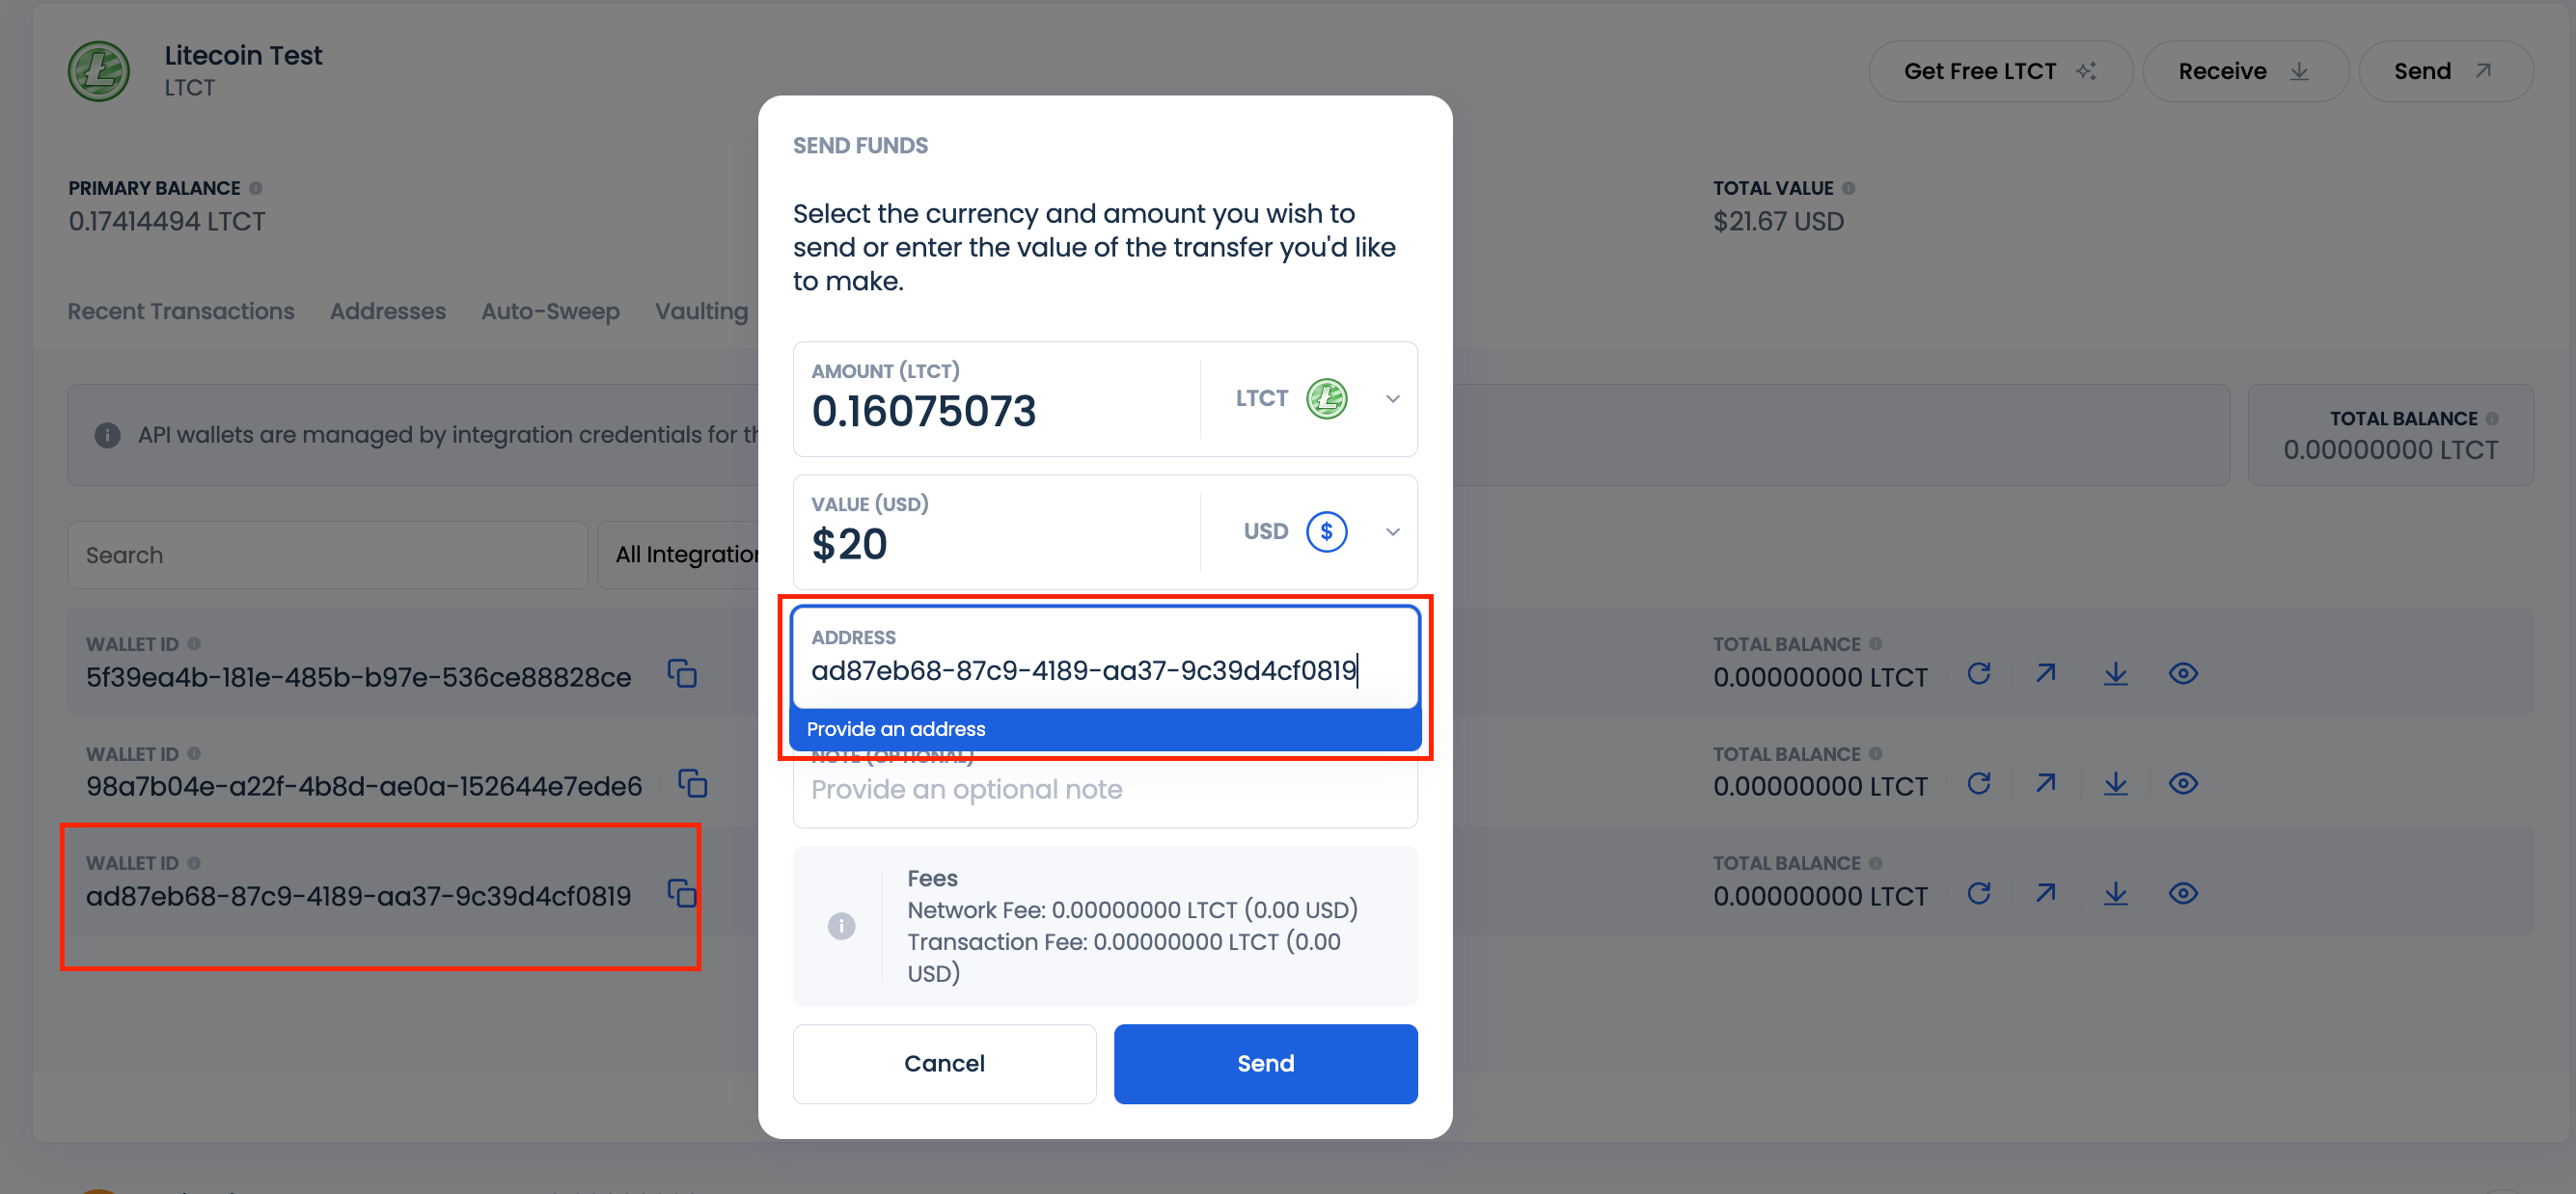
- Provoke a Switch:
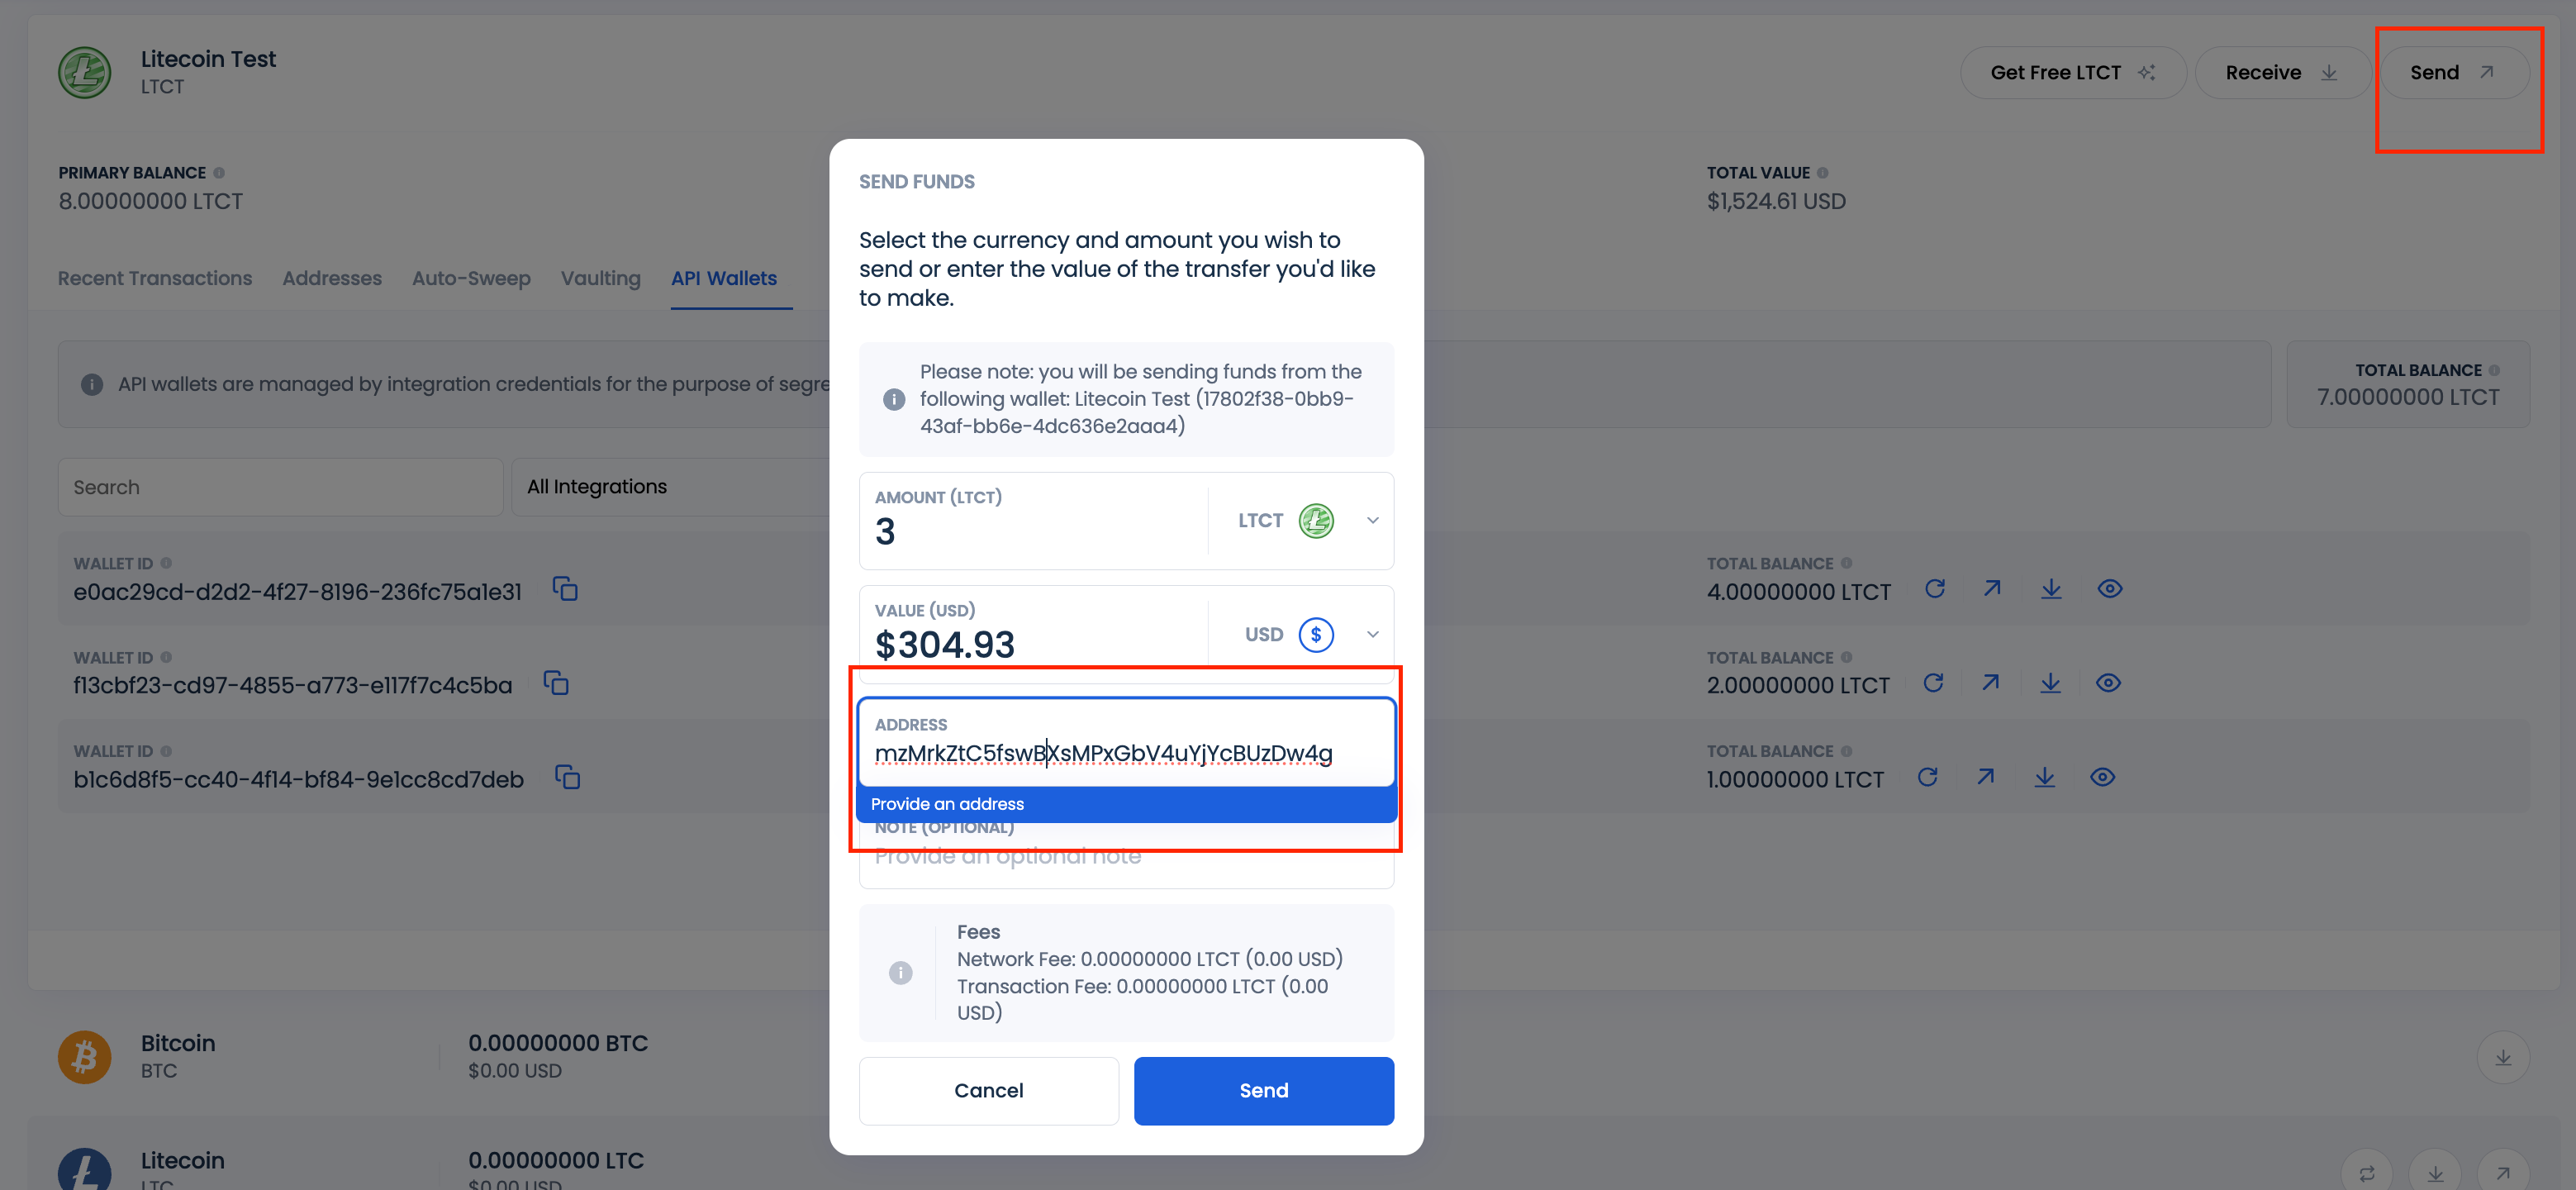
- Click on the Ship button subsequent to the Main pockets steadiness on the Dashboard UI.
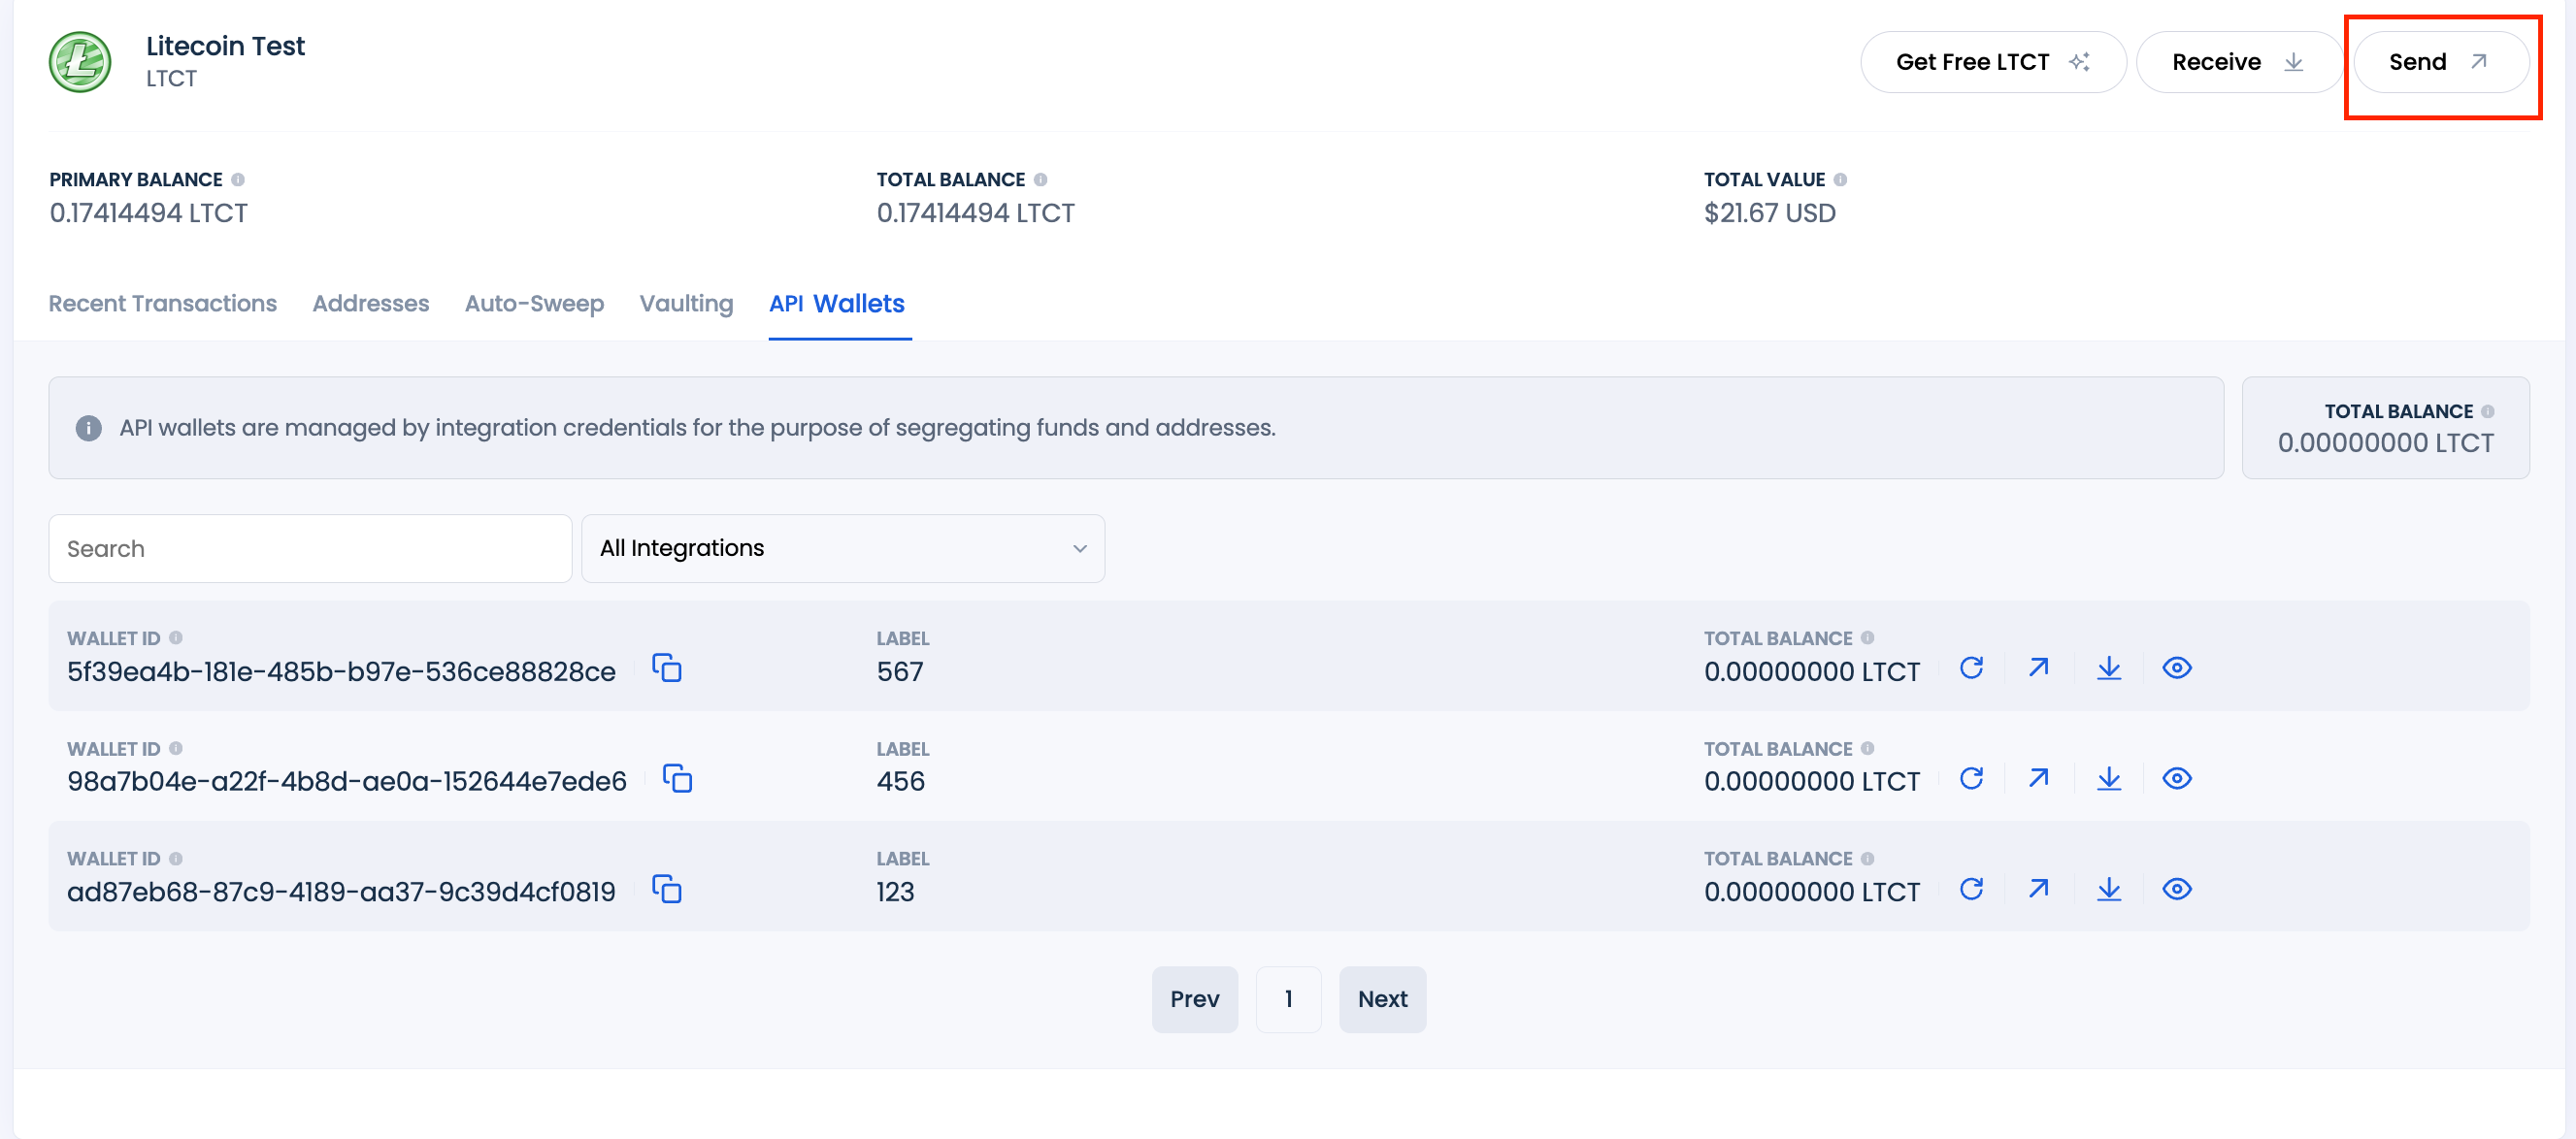
- Within the pop-up type, paste the copied API pockets ID and enter the quantity to switch.
- Verify the switch.
Transferring Funds to API Wallets with Everlasting Addresses
For API wallets utilizing everlasting addresses, funds have to be deposited straight into an tackle throughout the pockets moderately than into the pockets steadiness itself:
- Generate an Tackle:

- Confirm Tackle Availability:
- Provoke a Withdrawal:
- Create a withdrawal from the Main steadiness by way of the Dashboard UI to the everlasting tackle.
- Monitor the Switch:
- Test the API Balances tab to verify the funds are deposited into the API pockets related to the everlasting tackle.
That’s it — congratulations on efficiently integrating CoinPayments into what you are promoting!
In case you want any help, our buyer help workforce is all the time right here to assist.